QH_ROS_android_sdk使用指引
配置要求:
sdk以虚拟机的形式给出,包含整套开发环境。由于需要在虚拟机中跑android studio,对开发电脑配置要求较高,最少8G内存PC。
知识背景:
本sdk基于ros官方的ros android,默认我们所有的ros版本是indigo。
以下是相关文档入口:
1.ros 中文文档入口
2.rosjava的wiki入口,rosjava javadoc
3.ros android(java)的主要入口
为了更好地使用本sdk,请尽量熟悉上述相关知识概念。
整体框架:
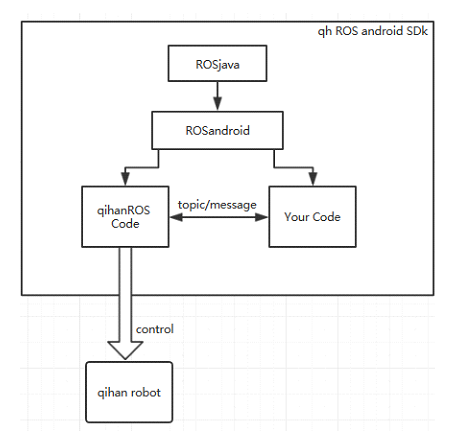
1.ros android和ros java使用的是官方的ros代码,ros android 基于ros java。
2.qihanROS Code充当ros master(主控)角色,Your Code充当Client角色。我们的sdk中有一套Client的示例程序。
3.Client 通过topic/message与master通信,master控制qihan robot。从而实现Client对robot的间接控制。相应topic/messag格式请参阅旗瀚发布的相关控制协议。
RosAndroid开发环境
1.安装及导入虚拟机
1.1安装VirtualBox
在导入虚拟机前,请先安装好最新版本virtualbox
1.2在VirtualBox导入我们所提供的.ova格式的虚拟机镜像
管理-》导入虚拟电脑-》
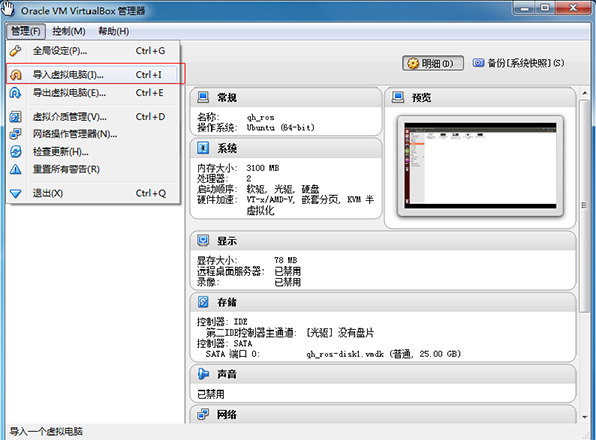
选择.ova文件-》
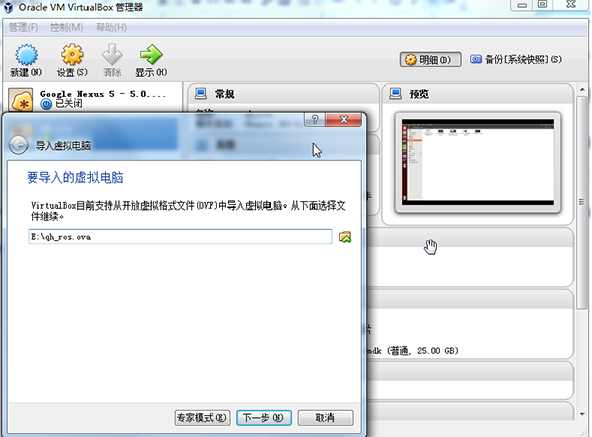
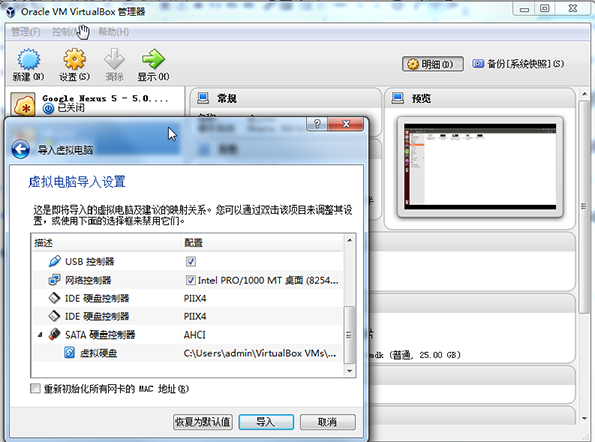
导入(不用修改配置,大概要10分钟)
2.使用详情
2.1打开虚拟机
ubuntu登陆用户名:yly 密码:yly
2.2导出和导入studio个人配置文件?
桌面双击studio.sh可以打开android studio
教程(百度经验):
http://jingyan.baidu.com/article/e4511cf355fbe02b845eafe9.html
studio导入个人配置,要重新配置jdk路径/usr/lib/jvm/java-7-openjdk-amd64!

2.3添加usb设备
添加usb设备(机器)到Ubuntu虚拟机:
选择虚拟机-》设置-》USB-》启用USb控制器(打钩),USB1.1控制器(打钩)然后点击对话框右侧的蓝色USB图标新建一个新筛选器并勾上(不要在这选择usb设备,要启动虚拟机后在菜单栏中选择才有效);

启动qh_ros虚拟机-》菜单栏中设备-》USB-》直接选择连接到主机上的usb设备

注:菜单栏中设备的USB显示打钩了而在启动器中没有,那么重新拔插一次USB即可。
注:上面所讲的是使用虚拟机usb1.1连接目标机器进行调试,由于usb1.1性能问题,有时候会导致调试很慢。建议使用usb2.0控制器连接调试,使用usb2.0需要去virtualbox官方下载对应virtualbox版本的virtualbox extension pack的扩展安装包
PS:至此,ubuntu环境安装完毕:
打开虚拟机后,在ubuntu桌面上有以下文件(夹):
1.studio.sh : android studio执行文件,双击可打开android studio进行开发
2.android_dev_tool: android开发环境文件夹,包含了android sdk和android studio
3.android_core : ros android主要代码
4.ros_java : ros java主要代码
5.qh_ros: 包含一个旗瀚科技提供的project代码,qh_ros_user为客户daemo程序,用户可以基于此project来添加自己的代码或重新新建project。
3.Ubuntu下建roaandroid项目
PS:
1.虚拟机中已经新建好一个示例Project,路径如下:
/home/yly/qhros/src/qh_ros_user
2.安装到机器人上调试必须连接wifi网络,否则client APP与master之间不能通信
3.APP的打开顺序是:先连接wifi到任意路由器上,然后打开QHrosUser(或你自己创建的app)
3.1 按住ctrl+alt+t打开Ubuntu终端,按照下面的命令创建项目
(你也可以不新建项目而是直接基于我们在android studio里所提供的qh_ros_user项目来修改)
新建project:
1. mkdir -p ~/qhros/src
(先建文件夹qhros,注:可以自定义文件夹路径)
2. cd ~/qhros/src
(打开文件夹)
3. catkin_create_android_pkg qh_ros_user android_core rosjava_core std_msgs
(建project其中“qh_ros_user”为project名,并添加android_core,rosjava_core,std_msgs依赖)
新建module:
1. cd qh_ros_user
(打开project文件夹)
2. catkin_create_android_project -t 13 -p com.qihancloud.qh_ros_user qhros_user
(建module,其中目标版本13,“qhros_user”为module名)
初次编译:
1. cd ../..
(退回根目录qhros)
2. catkin_make
(catkin编译)
3.2在Android Studio 打开Project
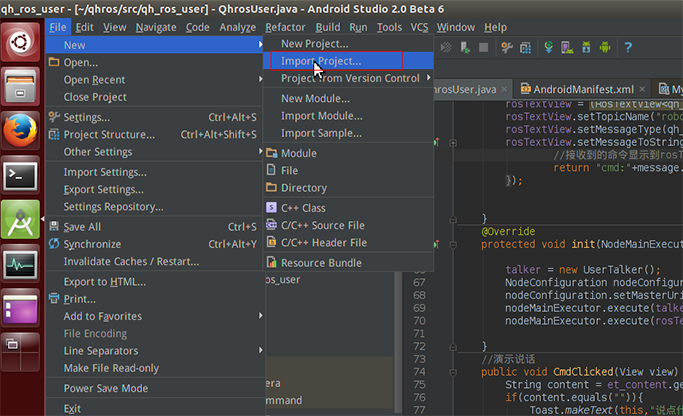
打开Android Studio,选择Import Porject

或者在File-》New中选择Import Porject
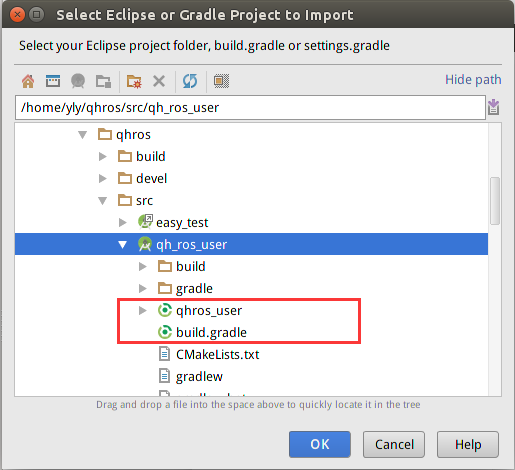
选择导入刚才创建的项目/home/yly/qhros/src/qh_ros_user的build.gradle
3.3添加依赖库
1.添加Message库拷贝jar包(在main文件夹下新建libs文件夹,把Message的jar包/home/yly/qhros/src/qh_test_msg-0.3.1.jar拷贝进文件夹)
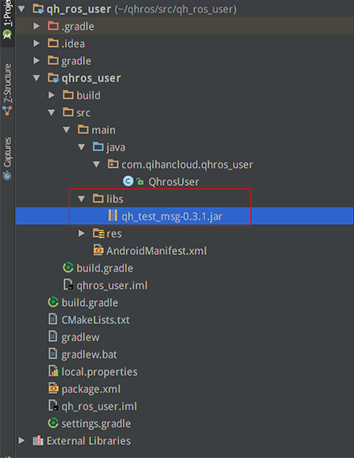
添加为库文件

注:同理添加控制机器人的命令库/home/yly/qhros/src/command-sdk.jar
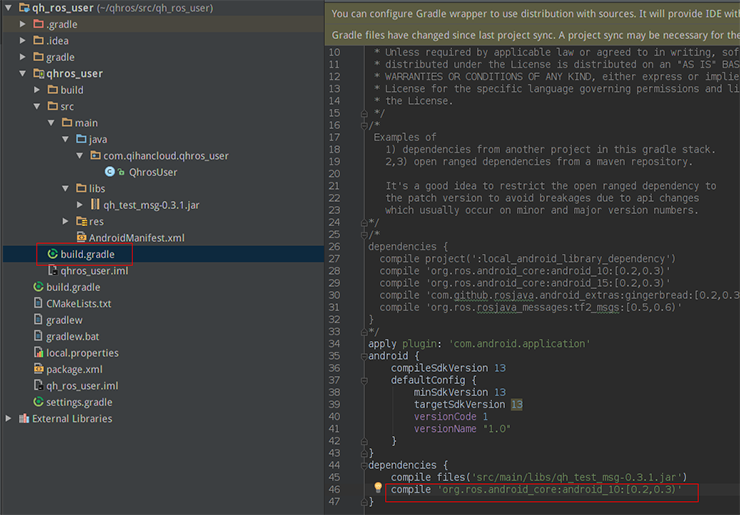
2.在项目的build.gradle中添加依赖的库android_core
dependencies {compile 'org.ros.android_core:android_10:[0.2,0.3)'}
3.Make Project编译

QhROS代码讲解
1.开发环境
Android studio+WIFI(app运行时要求具备网络环境)
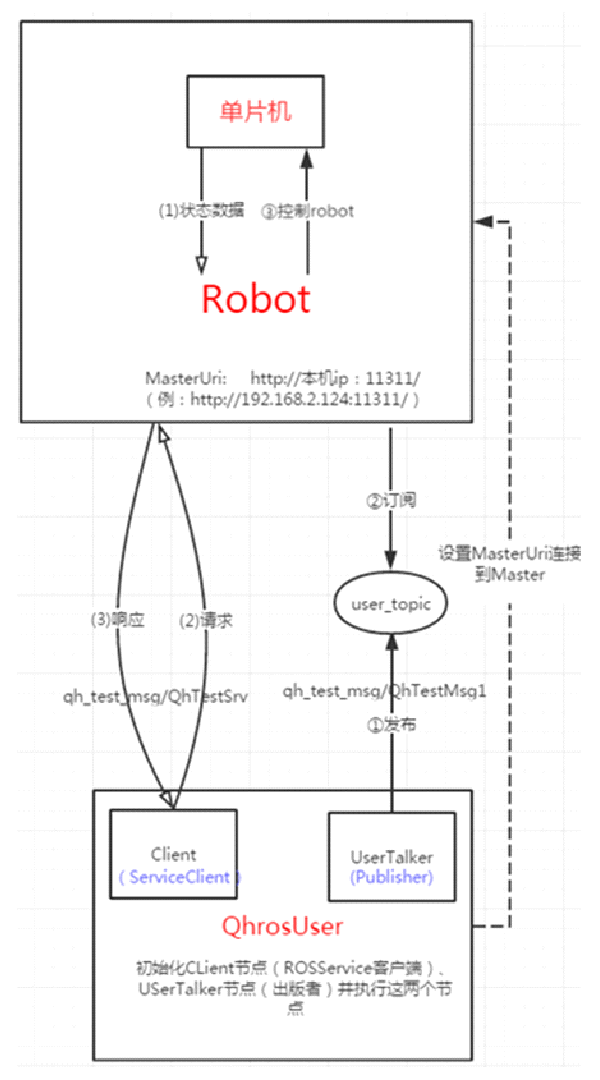
2.程序逻辑结构图
3.预备知识
3.1控制命令文档
机器人运动控制说明.docx
ps:用户需先浏览一遍本文档,简单了解控制robot的命令。
3.2 相关jar包
控制命令jar包:command-sdk.jar
消息jar包:qh_test_msg-0.3.2.jar
4. 主要功能代码
Ps:完整的代码.html
Ps:安装qhros发布的示例程序:user-release.apk
4.1 界面布局

4.2 演示robot抬头和说话
下面用控制robot抬头来简单说明如果控制robot。
使用command-sdk.jar库中的HeadUSBCommand类,创建一个该类对象。设置各个参数,调用command-sdk.jar库中的GsonUtil工具类的commandToJson()方法把命令参数转为json格式。
//创建头部命令对象
headUSBCommand = new HeadUSBCommand();
//设置头部移动参数
headUSBCommand.moveHeadMode = 1;//移动模式
headUSBCommand.moveHeadDirection = 1;//移动方向
headUSBCommand.moveHeadSpeed = 2;//移动速度
//cmd=2是头部命令,sub_cmd=0是命令预留位,调用Gson工具类,把命令参数转为json格式
SaveCmd(2,0, GsonUtil.commandToJson(headUSBCommand));
//ps:演示robot说话,只需要SaveCmd(100,0,"说话的内容");
把命令数据传递到UserTalker类(即是Publisher)
public void SaveCmd(int cmd, int sub_cmd,String content){
  SharedPreferencesUtil.saveInt(MyApplication.getContext(), "cmd", cmd);
  SharedPreferencesUtil.saveInt(MyApplication.getContext(), "subcmd", sub_cmd);
  SharedPreferencesUtil.saveString(MyApplication.getContext(), "content", content);
  //标记置为true
  SharedPreferencesUtil.saveBoolean(MyApplication.getContext(), "flag", true);
}
创建一个message对象,根据传递过来的命令数据设置这个message对象的值,最后发布到主题“user_topic”。
//从SharedPreferences获取命令
if(SharedPreferencesUtil.getBoolean(MyApplication.getContext(), "flag")){
//创建一个message对象
QhTestMsg1 str= (QhTestMsg1) publisher.newMessage();
//设置命令
str.setCmd( SharedPreferencesUtil.getInt(MyApplication.getContext(), "cmd"));
str.setSubCmd( SharedPreferencesUtil.getInt(MyApplication.getContext(), "subcmd"));
str.setContent(SharedPreferencesUtil.getString(MyApplication.getContext(), "content"));
//标记置为false
SharedPreferencesUtil.saveBoolean(MyApplication.getContext(), "flag",false);
//发布message
publisher.publish(str);
注:QhTestMsg1消息接口:三个参数cmd、sub_cmd、content构成控制rotot的命令。
public interface QhTestMsg1 extends Message {
  //命名格式可以用“包名/接口名”
  String _TYPE = "qh_test_msg/QhTestMsg1";
  //消息定义的描述,两个int类型和一个string类型的数据
  String _DEFINITION = "int64 cmd\nint64 sub_cmd\nstring content\n\n";
  //获取宏定义
  long getCmd();
  //设置宏定义(传入一个int值)
  void setCmd(long var1);
  //获取子宏定义
  long getSubCmd();
  //设置子宏定义(预留位,暂时都设置为0即可)
  void setSubCmd(long var1);
  //获取具体控制内容
  String getContent();
  //设置具体控制内容
  void setContent(String var1);
}
4.3演示获取当前电量
创建一个RosService的客户端
ServiceClient<QhTestSrvRequest, QhTestSrvResponse> serviceClient =connectedNode.newServiceClient("QhServer", qh_test_msg.QhTestSrv._TYPE);
创建一个message对象,根据想要获取robot哪种状态设置相应的cmd命令。
QhTestSrvRequest request = serviceClient.newMessage();
request.setCmd(16);//cmd=16获取电量命令
RosService的客户端,调用call方法,如果成功连接RosService的服务端,onSuccess获取返回值response。
serviceClient.call(request,  new ServiceResponseListener<QhTestSrvResponse>() {
  @Override
  public void onSuccess(QhTestSrvResponse response) {
    }
  @Override
  public void onFailure(RemoteException e) {
    throw new RosRuntimeException(e);
  }
});
response的getContent()方法得到需要的content内容。这个content是json类型,必要转换成对应类型的javabean(command-sdk.jar库中的HqueryBatteryCommand类),再从Javabean中获取需要的值。
String content = response.getContent();
//把json转javabean
QueryBatteryCommand queryBatteryCommand = (QueryBatteryCommand) GsonUtil.jsonToCommand(content, QueryBatteryCommand.class);
//获取当前电量
byte battery = queryBatteryCommand.currentBattery;
机器人运动控制说明
1.机器人说话说明
宏定义:100
只需要发送宏定义和说话的内容
举例:让机器人说“你好”,发送一个int值100和一个String值”你好”即可
2.头部运动说明
宏定义:HeadUSBCommand = 2
对应的类:HeadUSBCommand
所具有的属性:moveHeadMode(移动模式)、moveHeadDirection(移动方向)、moveHeadSpeed(移动速度)、moveHeadLSBDegree(移动低位角度)、moveHeadMSBDegree(移动高位角度)、horizontalLSBDegree(水平低位角度)、horizontalMSBDegree(水平高位角度)、verticalLSBDegree(垂直低位角度)、verticalMSBDegree(垂直高位角度)、horizontal_relative_direction(相对水平方向)、horizontalDegree(相对水平角度)、vertical_relative_direction(相对垂直方向)、verticalDegree(相对垂直角度)
特别说明:
头部水平方向运动角度范围:0-180度
头部垂直方向运动角度范围:0-30度
高低位说明:
如你需要控制头部转到180度,那么moveHeadLSBDegree和moveHeadMSBDegree的值需要怎么填写呢:
需要通过移位运算进行计算,计算方式如下:
moveHeadMSBDegree=(byte)(((short)180>>8)&0xff)
moveHeadLSBDegree=(byte)((short)180&0xff)
注:其他参数带有LSB和MSB字段的都需要像上面那样进行运算。
当moveHeadMode等于1时,为无角度操作,需要给HeadUSBCommand对象设置moveHeadDirection和moveHeadSpeed属性,其中moveHeadDirection的值对应运动方向如下:
moveHeadDirection=1;(向上)
moveHeadDirection=2;(向下)
moveHeadDirection=3;(向左)
moveHeadDirection=4;(向右)
moveHeadDirection=5;(左上)
moveHeadDirection=6;(右上)
moveHeadDirection=7;(左下)
moveHeadDirection=8;(右下)
moveHeadDirection=9;(垂直方向归位)
moveHeadDirection=10;(水平方向归位)
moveHeadDirection=11;(垂直和水平方向全归位)
moveHeadDirection=0;(停止移动)
例子如下:
头部向上移动
HeadUSBCommand command=new HeadUSBCommand();
command.moveHeadMode=1;
command.moveHeadDirection=1;
command.moveHeadSpeed=3;
注意地方:
1、 动作执行到阈值会自己停止
2、 前一个动作没有执行完,如有下一个动作命令过来,前一个动作会被打断执行当前动作。
3、 当前运动模式(moveHeadMode=1),有效属性为moveHeadDirection和moveHeadSpeed,其他属性不需要设置,不然命令会无效。
当moveHeadMode等于2时,为带角度操作(相对角度),需要给HeadUSBCommand对象设置moveHeadDirection、moveHeadSpeed、moveHeadLSBDegree和moveHeadMSBDegree属性,其中moveHeadDirection的值对应运动方向如下:
moveHeadDirection=1;(向上)
moveHeadDirection=2;(向下)
moveHeadDirection=3;(向左)
moveHeadDirection=4;(向右)
moveHeadDirection=5;(左上)
moveHeadDirection=6;(右上)
moveHeadDirection=7;(左下)
moveHeadDirection=8;(右下)
moveHeadDirection=0;(停止移动)
例子如下:
头部向左移动100度
HeadUSBCommand command=new HeadUSBCommand();
command.moveHeadMode=2;
command.moveHeadDirection=3;
command.moveHeadSpeed=3;
command.moveHeadLSBDegree=100;
command.moveHeadMSBDegree=0;
注意地方:
1、 前一个动作没有执行完,如有下一个动作命令过来,前一个动作会被打断执行当前动作。
2、 当前运动模式(moveHeadMode=2),有效属性为moveHeadDirection、moveHeadSpeed、moveHeadLSBDegree和moveHeadMSBDegree,其他属性不需要设置,不然命令会无效。
当moveHeadMode等于3时,为带角度操作(绝对角度),需要给HeadUSBCommand对象设置moveHeadDirection、moveHeadSpeed、moveHeadLSBDegree和moveHeadMSBDegree属性,其中moveHeadDirection的值对应运动方向如下:
moveHeadDirection=1;(垂直方向)
moveHeadDirection=2;(水平方向)
例子如下:
头部移动到水平100度
HeadUSBCommand command=new HeadUSBCommand();
command.moveHeadMode=2;
command.moveHeadDirection=3;
command.moveHeadSpeed=3;
command.moveHeadLSBDegree=100;
command.moveHeadMSBDegree=0;
注意地方:
1、 前一个动作没有执行完,如有下一个动作命令过来,前一个动作会被打断执行当前动作。
2、 当前运动模式(moveHeadMode=3),有效属性为moveHeadDirection、moveHeadSpeed、moveHeadLSBDegree和moveHeadMSBDegree,其他属性不需要设置,不然命令会无效。
当moveHeadMode等于0x20时,为特定动作,需要给HeadUSBCommand对象设置moveHeadDirection属性,其中moveHeadDirection的值对应运动方向如下:
moveHeadDirection=1;(走到水平90度后上锁)
例子如下:
水平电机走到90度后上锁
HeadUSBCommand headUSBCommand = new HeadUSBCommand();
headUSBCommand.moveHeadMode = 0x20;
headUSBCommand.moveHeadDirection=1;
注意地方:
1、 执行该动作后电机会上锁,上锁后不要用手扳动机器人脑袋
2、 当前运动模式(moveHeadMode=0x20),有效属性为moveHeadDirection,其他属性不需要设置,不然命令会无效。
当moveHeadMode等于0x21时,为定位操作(绝对角度),需要给HeadUSBCommand对象设置moveHeadDirection、horizontalLSBDegree、horizontalMSBDegree、verticalLSBDegree、verticalMSBDegree属性,其中moveHeadDirection的值对应操作如下:
moveHeadDirection=0;(动作后不上锁)
moveHeadDirection=1;(动作后水平上锁)
moveHeadDirection=2; (动作后垂直上锁)
moveHeadDirection=3; (动作后垂直水平均上锁)
例子如下:
让头部移动到水平方向90度,垂直方向15度,动作后不上锁
HeadUSBCommand headUSBCommand = new HeadUSBCommand();
headUSBCommand.moveHeadMode = 0x21;
headUSBCommand.moveHeadDirection=0;
headUSBCommand.horizontalLSBDegree=90;
headUSBCommand.horizontalMSBDegree=0;
headUSBCommand.verticalLSBDegree=15;
headUSBCommand.verticalMSBDegree=0;
注意地方:
1、 执行该动作后电机会上锁,上锁后不要用手扳动机器人脑袋
2、 当前运动模式(moveHeadMode=0x21),有效属性为moveHeadDirection、horizontalLSBDegree、horizontalMSBDegree、verticalLSBDegree、verticalMSBDegree,其他属性不需要设置,不然命令会无效。
当moveHeadMode等于0x22时,为定位操作(相对角度),需要给HeadUSBCommand对象设置moveHeadDirection、horizontal_relative_direction、horizontalDegree、vertical_relative_direction、verticalDegree属性,其中moveHeadDirection、horizontal_relative_direction和vertical_relative_direction的值对应操作如下:
moveHeadDirection=0;(动作后不上锁)
moveHeadDirection=1;(动作后水平上锁)
moveHeadDirection=2; (动作后垂直上锁)
moveHeadDirection=3; (动作后垂直水平均上锁)
horizontal_relative_direction=1(向左)
horizontal_relative_direction=2(向右)
vertical_relative_direction=1(向上)
vertical_relative_direction=2(向下)
例子如下:
在原有位置上向左移动100度,向上移动15度,动作后不上锁
HeadUSBCommand headUSBCommand = new HeadUSBCommand();
headUSBCommand.moveHeadMode = 0x22;
headUSBCommand.moveHeadDirection=0;
headUSBCommand.horizontal_relative_direction=1;
headUSBCommand.horizontalDegree=100;
headUSBCommand.vertical_relative_direction=1;
headUSBCommand.verticalDegree=15;
注意地方:
1、 执行该动作后电机会上锁,上锁后不要用手扳动机器人脑袋
2、 当前运动模式(moveHeadMode=0x22),有效属性为moveHeadDirection、horizontal_relative_direction、horizontalDegree、vertical_relative_direction、verticalDegree其他属性不需要设置,不然命令会无效。
3. 车轮控制说明
宏定义:WheelUSBCommand = 1
对应的类:WheelUSBCommand
所具有的属性:moveWheelMode(移动模式)、moveWheelDirection(移动方向)、moveWheelSpeed(移动速度)、moveWheelLSBDegree(移动低位角度)、moveWheelMSBDegree(移动高位角度)、moveWheelLSBTime(移动低位时间)、moveWheelMSBTime(移动高位时间)、moveWheelLSBDistance(移动低位距离)、moveWheelMSBDistance(移动高位距离)、isCircle(是否持续动作)
当moveWheelMode等于1时,为无角度操作,需要给WheelUSBCommand对象设置moveWheelDirection、moveWheelSpeed、moveWheelLSBTime、moveWheelMSBTime
、isCircle属性,其中moveWheelDirection的值对应操作如下:
moveWheelDirection=1;(前进)
moveWheelDirection=2;(后退)
moveWheelDirection=3;(左转)
moveWheelDirection=4;(右转)
moveWheelDirection=10;(左平移)
moveWheelDirection=11;(右平移)
moveWheelDirection=0x0c;(左拐弯)
moveWheelDirection=0xd;(右拐弯)
moveWheelDirection=0xf0;(停止拐弯)
moveWheelDirection=0;(停止行走)
例子如下:
轮子向前移动10s。
WheelUSBCommand wheelUSBCommand = new WheelUSBCommand();
wheelUSBCommand.moveWheelMode = 1;
wheelUSBCommand.moveWheelLSBTime = 10;
wheelUSBCommand.moveWheelMSBTime = 0;
wheelUSBCommand.moveWheelSpeed = 5;
wheelUSBCommand.isCircle = 1;
wheelUSBCommand.moveWheelDirection=1;
轮子一直向前走:
WheelUSBCommand wheelUSBCommand = new WheelUSBCommand();
wheelUSBCommand.moveWheelMode = 1;
wheelUSBCommand.moveWheelLSBTime = 0;
wheelUSBCommand.moveWheelMSBTime = 0;
wheelUSBCommand.moveWheelSpeed = 5;
wheelUSBCommand.isCircle = 0;
wheelUSBCommand.moveWheelDirection=1;
特别注意:
停止行走、左拐弯、右拐弯、停止拐弯,不需要带moveWheelLSBTIme、moveWheelMSBTIme、moveWheelSpeed、isCircle属性,例子如下:
停止行走:
WheelUSBCommand wheelUSBCommand = new WheelUSBCommand();
wheelUSBCommand.moveWheelMode = 0x01;
wheelUSBCommand.moveWheelDirection = 0;
注意地方:
1、 当前运动模式(moveWheelMode=1),停止行走、左拐弯、右拐弯、停止拐弯不需要带moveWheelLSBTIme、moveWheelMSBTIme、moveWheelSpeed、isCircle属性,其他动作需要带moveWheelLSBTIme、moveWheelMSBTIme、moveWheelSpeed、isCircle属性。否则命令无效。
2、 轮子向前过程中需要注意是否前面有障碍物,有障碍物会自动停止,机器人后面没有避障功能,控制向后走时需要注意后面是否有物体存在。
当moveWheelMode等于2时,为带角度操作(相对角度),需要给WheelUSBCommand对象设置moveWheelDirection、moveWheelSpeed、moveWheelLSBDegree、moveWheelMSBDegree属性,其中moveWheelDirection的值对应操作如下:
moveWheelDirection=1;(左转)
moveWheelDirection=2;(右转)
moveWheelDirection=0;(停止转动)
例子如下:
向左旋转30度:
WheelUSBCommand wheelUSBCommand = new WheelUSBCommand();
wheelUSBCommand.moveWheelMode = 2;
wheelUSBCommand.moveWheelSpeed = 5;
wheelUSBCommand.moveWheelLSBDegree = 30;
wheelUSBCommand.moveWheelMSBDegree = 0;
wheelUSBCommand.moveWheelDirection=1;
注意地方:
1、 当前运动模式(moveWheelMode=2),停止转动不需要带moveWheelLSBDegree、moveWheelMSBDegree、moveWheelSpeed属性,其他动作需要moveWheelLSBDegree、moveWheelMSBDegree、moveWheelSpeed属性。否则命令无效。
当moveWheelMode等于0x11时,为带距离操作,需要给WheelUSBCommand对象设置moveWheelDirection、moveWheelSpeed、moveWheelLSBDistance、moveWheelMSBDistance属性,其中moveWheelDirection的值对应操作如下:
moveWheelDirection=1;(前进)
moveWheelDirection=2;(后退)
moveWheelDirection=3;(左前)
moveWheelDirection=4;(左后)
moveWheelDirection=5;(右前)
moveWheelDirection=6;(右后)
moveWheelDirection=7;(左平移)
moveWheelDirection=8;(右平移)
moveWheelDirection=0;(停止行走)
例子如下:
向左平移20cm
WheelUSBCommand wheelUSBCommand = new WheelUSBCommand();
wheelUSBCommand.moveWheelMode = 0x11;
wheelUSBCommand.moveWheelDirection = 0x07;
wheelUSBCommand.moveWheelSpeed = 0x02;
wheelUSBCommand.moveWheelLSBDistance = 20;
wheelUSBCommand.moveWheelMSBDistance = 0;
注意地方:
1、当前运动模式(moveWheelMode=0x11),停止行走不需要带moveWheelLSBDistance、moveWheelMSBDistance、moveWheelSpeed属性,其他动作需要moveWheelLSBDistance、moveWheelMSBDistance、moveWheelSpeed属性。否则命令无效。
4.翅膀控制说明
宏定义:HandUSBCommand = 3
对应的类:HandUSBCommand
所具有的属性:moveHandMode(移动模式)、whichHand(控制哪一个翅膀)、moveHandDirection(运动方向)、moveHandSpeed(移动速度)、moveHandLSBTime(移动底位时间)、moveHandMSBTime(移动高位时间)、moveHandLSBDegree(移动底位角度)、moveHandMSBDegree(移动高位角度)。
特别说明:
翅膀运动的角度范围为:0-270度
当moveHandMode等于1时,为无角度操作,需要给HandUSBCommand对象设置whichHand、moveHandSpeed、moveHandDirection属性,其中moveHandDirection、whichHand的值对应操作如下:
moveHandDirection=1;(向上)
moveHandDirection=2;(向下)
moveHandDirection=3;(停止)
moveHandDirection=4;(归位)
whichHand=1;(左手)
whichHand=2;(右手)
whichHand=3;(双手)
例子如下:
左手向上:
HandUSBCommand handUSBCommand = new HandUSBCommand();
handUSBCommand.moveHandMode = 1;
handUSBCommand.whichHand = 1;
handUSBCommand.moveHandSpeed = 0x05;
handUSBCommand.moveHandDirection=1;
双手向下:
HandUSBCommand handUSBCommand = new HandUSBCommand();
handUSBCommand.moveHandMode = 1;
handUSBCommand.whichHand = 3;
handUSBCommand.moveHandSpeed = 0x05;
handUSBCommand.moveHandDirection=2;
注意地方:
1、当前运动模式(moveWheelMode=1),动作需要whichHand、moveHandSpeed、moveHandDirection属性。否则命令无效。
当moveHandMode等于2时,为带角度操作(相对角度),需要给HandUSBCommand对象设置whichHand、moveHandSpeed、moveHandDirection、moveHandLSBDegree、moveHandMSBDegree属性,其中moveHandDirection、whichHand的值对应操作如下:
moveHandDirection=1;(向上)
moveHandDirection=2;(向下)
whichHand=1;(左手)
whichHand=2;(右手)
例子如下:
左手在当前位置向下移动80度:
HandUSBCommand handUSBCommand = new HandUSBCommand();
handUSBCommand.whichHand = 1;
handUSBCommand.moveHandMode = 2;
handUSBCommand.moveHandSpeed = 0x05;
handUSBCommand.moveHandLSBDegree = 80;
handUSBCommand.moveHandMSBDegree = 0;
handUSBCommand.moveHandDirection=2;
注意地方:
1、当前运动模式(moveWheelMode=2),动作需要设置whichHand、moveHandSpeed、moveHandDirection、moveHandLSBDegree、moveHandMSBDegree属性。否则命令无效。
当moveHandMode等于3时,为带角度操作(绝对角度),需要给HandUSBCommand对象设置whichHand、moveHandSpeed、moveHandDirection、moveHandLSBDegree、moveHandMSBDegree属性,其中moveHandDirection、whichHand的值对应操作如下:
whichHand=1;(左手)
whichHand=2;(右手)
例子如下:
右手运动到90度位置
HandUSBCommand handUSBCommand = new HandUSBCommand();
handUSBCommand.moveHandMode = 0x03;
handUSBCommand.whichHand = 2;
handUSBCommand.moveHandSpeed = 0x08;
handUSBCommand.moveHandDirection = 0x01; handUSBCommand.moveHandLSBDegree = 90;
handUSBCommand.moveHandMSBDegree = 0;
注意地方:
1、当前运动模式(moveWheelMode=3),动作需要设置whichHand、moveHandSpeed、moveHandDirection、moveHandLSBDegree、moveHandMSBDegree属性且moveHandDirection的值必须为1。否则命令无效。
5. 获取当前电量说明
宏定义:QueryBatteryCommand = 16
对应的类:QueryBatteryCommand
所具有的属性:battery(占位符)、currentBattery(当前电量)。
完整的代码
1.MainActivity类
继承Activity,注册WifiReceiver广播接收者,用于监听wifi情况,只有wifi情况下才启动QhdrosUser。
public class MainActivity extends Activity {

    private static final String TAG = "MainActivity";
    private WifiReceiver mWifiReceiver;
    @Override
    protected void onCreate(Bundle savedInstanceState) {
        super.onCreate(savedInstanceState);
        setContentView(R.layout.activity_main);
        IntentFilter filter = new IntentFilter();
        filter.addAction("android.net.wifi.RSSI_CHANGED");
        filter.addAction("android.net.wifi.STATE_CHANGE");
        filter.addAction("android.net.wifi.WIFI_STATE_CHANGED");

        mWifiReceiver = new WifiReceiver();
        registerReceiver(mWifiReceiver, filter);
        Log.d(TAG, "onCreate...");


    }

    @Override
    protected void onResume() {
       finish();
        super.onResume();

    }

    @Override
    protected void onPause()

    @Override
    protected void onDestroy() {
        unregisterReceiver(mWifiReceiver);
        super.onDestroy();
        Log.d(TAG, "onDestroy...");
    }

    public  class WifiReceiver extends BroadcastReceiver {
        @Override
        public void onReceive(Context context, Intent intent) {
            // TODO Auto-generated method stub
            if(intent.getAction().equals(WifiManager.RSSI_CHANGED_ACTION)){
                //signal strength changed
            }
            else if(intent.getAction().equals(WifiManager.NETWORK_STATE_CHANGED_ACTION))
                else if(info.getState().equals(NetworkInfo.State.CONNECTED)){

                    WifiManager wifiManager = (WifiManager)context.getSystemService(Context.WIFI_SERVICE);
                    WifiInfo wifiInfo = wifiManager.getConnectionInfo();

                    //获取当前wifi名称
                    System.out.println("连接到网络 " + wifiInfo.getSSID());
                    Intent intent2 = new Intent(getBaseContext(), QhrosUser.class);//启动roscore和两个节点
                    intent2.addFlags(Intent.FLAG_ACTIVITY_NEW_TASK);
                    getBaseContext().startActivity(intent2);

                }

            }
            else if(intent.getAction().equals(WifiManager.WIFI_STATE_CHANGED_ACTION))
                else if(wifistate == WifiManager.WIFI_STATE_ENABLED){
                    System.out.println("系统开启wifi");


                }
            }
        }
    }
}
2.QhrosUser类
继承RosActivity活动,生命周期方法onCreate只执行一次,用于加载布局,先初始化rosTextView节点(订阅者),init方法初始化talker节点(出版者)并执行这两个节点
RosActivity是所有ROS Android应用的基本类,通过QhrosUser来介绍如何写最基本ROS的Publisher和Subscriber。当学会Publisher和Subscriber也就相当于学会ROSjava一大半了,因为ROS机器人的所有行为都是建立在信息的发送与订阅的基础上。
/*这样当activity启动时:1.在前台启动NodeMainExecutorService;2.开始一个连接到master URI,并且显示正在进行的通告信息通知用户ROS节点正在后台运行。*/
public class QhrosUser extends RosActivity
{
    private RosTextView<QhTestMsg1> rosTextView;

    private static final String TAG = "UserTalker";
    private UserTalker talker;
    private EditText   et_content;
    private Button     bt_cmd;
    private Button     bt_cmd1;
    public QhrosUser() {

/*超构造函数中,两个String是Android通告的标题和断续器信息。用户只需要关闭这个通告就可以关闭与该应用联系的所有ROS节点。URI是链接到本机的MasterUri*/
        super("User2", "User", URI.create("http://"+ InetAddressFactory.newNonLoopback().getHostAddress()+":11311/"));
    }
    /** Called when the activity is first created. */
    @Override
    public void onCreate(Bundle savedInstanceState)
    {
        super.onCreate(savedInstanceState);
        setContentView(R.layout.main);
        et_content = (EditText) findViewById(R.id.et_content);
        bt_cmd = (Button) findViewById(R.id.bt_cmd);
        bt_cmd1 = (Button) findViewById(R.id.bt_cmd1);

        rosTextView = (RosTextView<qh_test_msg.QhTestMsg1>) findViewById(R.id.text);//自定义控件(同时也是节点)
        rosTextView.setTopicName("robot_topic");//设置主题名称(注:这个名称和Publisher设置的TopicName一样)
        rosTextView.setMessageType(qh_test_msg.QhTestMsg1._TYPE);//设置消息类型(库qh_test_msg中的类QhTestMsg1中的字段_TYPE)
            (注:这个名称和Publisher设置的Message Type一样)
        rosTextView.setMessageToStringCallable(new MessageCallable<String, qh_test_msg.QhTestMsg1>()
        });


    }
/*我们定义抽象函数 RosActivity.init,这里我们开始了 NodeMain。与masterURI建立连接,执行talker发布信息,执行rosTextView显示输入信息。
  而且这里RosAcitivity操纵着其他应用的生命周期的管理,包括:1.获取和释放WakeLocks和WifiLocks2.捆绑或者松绑NodeMainExecutorService3.当应用关闭时结束NodeMain*/
    @Override
    protected void init(NodeMainExecutor nodeMainExecutor) {

        talker = new UserTalker();
        NodeConfiguration nodeConfiguration = NodeConfiguration.newPublic(getRosHostname());//从一个公开可访问的节点获取节点配置(节点要跑的主机名)
        nodeConfiguration.setMasterUri(getMasterUri());//设置节点要注册的控制器的uri
        nodeMainExecutor.execute(talker, nodeConfiguration);//执行出版者节点
        nodeMainExecutor.execute(rosTextView, nodeConfiguration);//执行文字视图节点

    }
    //演示说话
    public void CmdClicked(View view) {
        String content = et_content.getText().toString();
        if(content.equals("")){
            Toast.makeText(this,"说点什么!",Toast.LENGTH_SHORT).show();
            return;
        }
        //cmd=100是说话命令,sub_cmd=0是命令预留位,content是说话内容
        SaveCmd(100,0,content);


    }
    //演示抬头
    public void CmdClicked1(View view) {
            //调用command-sdk.jar库中的方法,并设置各个参数

            //创建头部命令对象
            HeadUSBCommand headUSBCommand = new HeadUSBCommand();
            //设置头部移动参数
            headUSBCommand.moveHeadMode = 1;
            headUSBCommand.moveHeadDirection = 1;
            headUSBCommand.moveHeadSpeed = 2;
            //cmd=2是头部命令,sub_cmd=0是命令预留位,调用Gson工具类,把命令参数转为json格式
            SaveCmd(2,0, GsonUtil.commandToJson(headUSBCommand));

    }
    //保存命令到SharedPreferences
    public void SaveCmd(int cmd, int sub_cmd,String content){
        //MyApplication.getContext()为nul,没有在清单文件的<application>加上属性 android:name="com.qihan.uvccamera.MyApplication"
        SharedPreferencesUtil.saveInt(MyApplication.getContext(), "cmd", cmd);
        SharedPreferencesUtil.saveInt(MyApplication.getContext(), "subcmd", sub_cmd);
        SharedPreferencesUtil.saveString(MyApplication.getContext(), "content", content);
        //标记置为true
        SharedPreferencesUtil.saveBoolean(MyApplication.getContext(), "flag", true);
    }
}
3.UserTalker类
继承的是AbstractNodeMain (监听生命周期的NodeListener) 在生命周期方法onStart中传入一个ConnectedNode(已连接到控制器节点),调用连接节点的newPulisher方法生成一个出版者
public class UserTalker extends AbstractNodeMain {
    private static final String TAG = "UserTalker";
    private String topic_name;
    public UserTalker() {
        this.topic_name = "user_topic";
    }
    public UserTalker(String topic) {
        this.topic_name = topic;
    }
    public GraphName getDefaultNodeName() {
        return GraphName.of("test/UserTalker");
    }
    //在生命周期方法onStart中传入一个ConnectedNode(已连接到控制器节点)
    public void onStart(ConnectedNode connectedNode) {
        //调用连接节点的newPulisher方法生成一个出版者
        /*我们设置信息格式为qh_test_msg.QhTestMsg1._TYPE,发送给"user_topic主题,这两点是publisher的关键。*/
        final Publisher publisher = connectedNode.newPublisher(this.topic_name, "qh_test_msg/QhTestMsg1");
        connectedNode.executeCancellableLoop(new CancellableLoop() {
            //循环监听
            protected void loop() throws InterruptedException {

                //从SharedPreferences获取命令
                if(SharedPreferencesUtil.getBoolean(MyApplication.getContext(), "flag")){
                    //创建一个message对象
                    QhTestMsg1 str= (QhTestMsg1) publisher.newMessage();
                    //设置命令
                    str.setCmd( SharedPreferencesUtil.getInt(MyApplication.getContext(), "cmd"));
                    str.setSubCmd( SharedPreferencesUtil.getInt(MyApplication.getContext(), "subcmd"));
                    str.setContent(SharedPreferencesUtil.getString(MyApplication.getContext(), "content"));
                    //标记置为false
                    SharedPreferencesUtil.saveBoolean(MyApplication.getContext(), "flag",false);
                    //发布message
                    publisher.publish(str);

                }

            }
        });
    }
}
4.:Client类
继承的是AbstractNodeMain (监听生命周期的NodeListener)在生命周期方法onStart中传入一个ConnectedNode(已连接到控制器节点),调用连接节点的newServiceClient方法生成RosService的客户端
public class Client extends AbstractNodeMain {
    private static final String TAG = "Client";
    @Override
    public GraphName getDefaultNodeName() {
    return GraphName.of("qh_services/client");
    }
    @Override
    public void onStart(final ConnectedNode connectedNode) {
    ServiceClient<QhTestSrvRequest, QhTestSrvResponse> serviceClient;
    try {
        //参数1:服务名称(必须与RosService的服务端定义的名称一致);参数2:Message消息类型
        serviceClient = connectedNode.newServiceClient("QhServer", qh_test_msg.QhTestSrv._TYPE);
    } catch (ServiceNotFoundException e) {
        throw new RosRuntimeException(e);
    }
    //创建一个message对象,根据想要获取robot哪种状态设置相应的cmd命令
    final QhTestSrvRequest request = serviceClient.newMessage();
    request.setCmd(16);//cmd=16获取当前电量命令
    serviceClient.call(request,  new ServiceResponseListener<QhTestSrvResponse>() {
        @Override
        public void onSuccess(QhTestSrvResponse response) {
            //成功连接Ros服务,获取返回值
            String content = response.getContent();
            //把json转javabean
            QueryBatteryCommand queryBatteryCommand = (QueryBatteryCommand) GsonUtil.jsonToCommand(content, QueryBatteryCommand.class);
            //获取当前电量
            byte battery = queryBatteryCommand.currentBattery;
            Log.d("当前电量:",""+battery);
        }
        @Override
        public void onFailure(RemoteException e) {
            throw new RosRuntimeException(e);
        }
    });
    }
}
机器人SDK介绍
简介
机器人SDK为第三方开发者提供了使app与机器人交互的能力,开发者可以基于提供的SDK,实现控制机器人运动、获取机器人识别的话语以及控制机器人语音合成等功能。该SDK为可为广大开发者提供完整的软硬件交互解决方案,实现个性化开发,从而满足不同行业不同领域下机器人使用的独特需求。
七大模块
1.语音模块
提供获取机器人识别的话语、控制机器人唤醒休眠及语音合成的能力。
2.硬件控制模块
控制机器人上的部分硬件设备的行为,获取机器人的传感器数据。
3.头手轮子运动控制模块
提供控制机器人头部、手部及轮子三个部位运动的能力。
4.系统管理模块
获取机器人的基础信息、与机器人上的部分软件进行交互。
5.多媒体模块
可以通过此模块从机器人的高清摄像头获取音视频流,获取人脸识别的信息。
6.投影仪模块
控制机器人投影仪的开关以及相应参数的设置。
7.模块化运动控制模块
提供控制机器人系统上自带的自由行走、充电、跟随等模块化运动的能力。
三种Lib库
为方便广大开发者在不同的开发环境下都能够使用SDK,特别针对性地提供了三种lib库:适用于Android Studio工具使用的aar包;适用于Eclipse或NetBeans的A版jar包;为解决因使用了其他的第三方库而无法使Activity继承我们提供的BindBaseActivity的问题,推出的B版jar包。开发者可以根据自己的实际情况灵活选择,无需被迫改变开发环境和配置。
相互保密协议
甲方:深圳市三宝创新云技术有限公司
乙方:开发者
鉴于:
甲乙双方正在进行会谈或合作,需要获悉对方的相关业务和技术资料,为此,甲乙双方本着互惠互利、共同发展的原则,经友好协商签订本协议。
1. 保密资料的定义
甲乙双方中任何一方披露给对方的明确标注或指明是“保密资料”的相关业务和技术方面的
书面或其它形式的资料和信息(简称:保密资料),但不包括下述资料和信息:
(1) 已经或将公布于众的资料,但不包括甲乙双方或其代表违反本协议规定未经授权所披露的;
(2) 在任何一方向接受方披露前已为该方知悉的非保密性资料;
(3) 任何一方提供的非保密资料,接受方在披露这些资料前不知此资料提供者(第三方)已经与本协议下的非保密资料提供方订立过有约束力的保密协议,且接受方有理由认为资料披露者未被禁止向接受方提供该资料。
2. 双方责任
(1) 甲乙双方互为保密资料的提供方和接受方,负有保密义务,承担保密责任。
(2) 甲乙双方中任何一方未经对方书面同意不得向第三方(包括新闻界人士)公开和披露任何保密资料或以其他方式使用保密资料。双方也须促使各自代表不向第三方(包括新闻界人士)公开或披露任何保密资料或以其它方式使用保密资料。除非披露、公开或利用保密资料是双方从事或开展合作项目工作在通常情况下应承担的义务(包括双方今后依法律或合同应承担的义务)适当所需的。
(3) 双方均须把保密资料的接触范围严格限制在因本协议规定目的而需接触保密资料的各自负责任的代表的范围内。
(4) 除经过双方书面同意而必要进行披露外,任何一方不得将含有对方或其代表披露的保密资料复印或复制或者有意无意地提供给他人。
(5) 如果合作项目不再继续进行或其中一方因故退出此项目,经对方在任何时候提出书面要求,另一方应当、并应促使其代表在五个工作日内销毁或向对方返还其占有的或控制的全部保密资料以及包含或体现了保密资料的全部文件和其它材料并连同全部副本。但是在不违反本协议其它条款的条件下,双方可仅为本协议第四条之目的,保留上述文件或材料的复制件一份。
(6) 甲乙双方将以并应促使各自的代表以不低于其对自己拥有的类似资料的照料程度来对待对方向其披露的保密资料,但在任何情况下,对保密资料的照料都不能低于合理程度。
(7) 乙方不得以任何方式反编译、脱壳甲方提供的jar包、so文件、以及相关目标文件。
(8) 乙方不得将甲方所提供的任何控制指令以及中间件提供给任何第三方。
(9) 乙方不得在代码中将qh相关字符删除或者修改之后,输出给第三方。
(10) 乙方不得将甲方的代码、机器人控制思路、策略提供给任何第三方或发布到开源社区。
(11) 乙方不得将甲方提供的虚拟机镜像文件提供给任何第三方。
3. 知识产权
甲乙双方向对方或对方代表披露保密资料并不构成向对方或对方的代表的转让或授予另一方对其商业秘密、商标、专利、技术秘密或任何其它知识产权拥有的权益,也不构成向对方或对方代表转让或向对方或对方代表授予该方受第三方许可使用的商业秘密、商标、专利、技术秘密或任何其他知识产权的有关权益。
4. 保密资料的保存和使用
(1) 甲乙双方中的任何一方有权保存必要的保密资料,以便在履行其在合作项目工作中所承担的法律、规章与义务时使用该等保密资料。
(2) 甲乙双方有权使用保密资料对任何针对接受方或其代表的与本协议项目及其事务相关的索赔、诉讼、司法程序及指控进行抗辩,或者对与本协议项目及其事务相关的传唤、传票或其他法律程序做出答复。
(3) 任何一方在书面通知对方并将披露的复印件抄送对方后,可根据需要在提交任何市、省、中央或其他对接受方有管辖权或声称对接受方有管辖权的监管团体的任何报告、声明或证明中披露保密资料。
5. 争议解决和适用法律
本协议受中华人民共和国法律管辖并按中华人民共和国法律解释。对因本协议或本协议各方的权利和义务而发生的或与之有关的任何事项和争议、诉讼或程序,本协议双方不可撤销地接受中华人民共和国甲方所在地人民法院的管辖。