QH_ROS_android_sdk Use Guide
Configure Requirements:
SDK given in the form of virtual machine, including the entire development environment. Because of the need to run in a virtual machine Android studio, on the development of computer configuration requirements are higher, at least 8G memory PC.
Knowledge Background:
This sdk is based on the ros android official ros, and all ros versions are indigo by default.
Accesses to related documents include:
1.Access to Chinese ros documents
2.Wiki access to rosjava, rosjava javadoc
3.Main access to ros android (java)
In order to use this sdk better,please try to be familiar with the relevant knowledge of the above concepts.
Whole Framework:
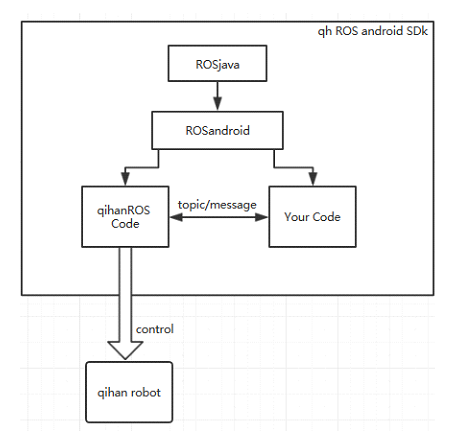
1.Both the ros android and ros java use offical ros code,and ros android is based on ros java.
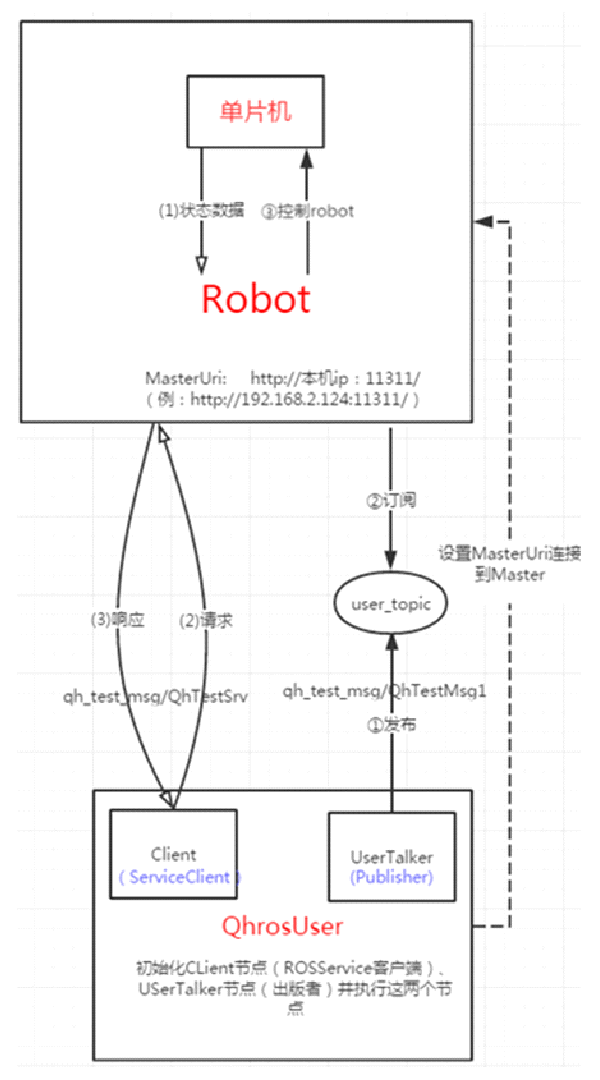
2.QihanROS Code serves as the ros master (master control), and Your code serves as Client. Our sdk contains a set of program examples for Client.
3.Client communicate with master through topic/message, and master controls qihan robot.So as to realize the indirect control of robot from Client. Please read the relevant control protocol which are announced by Qihan to know more about topic/message format.
RosAndroid Develop Environment
1. Install and import virtual machine
1.1 Install VirtualBox
Please install virtualbox of the latest version before import virtual machine.
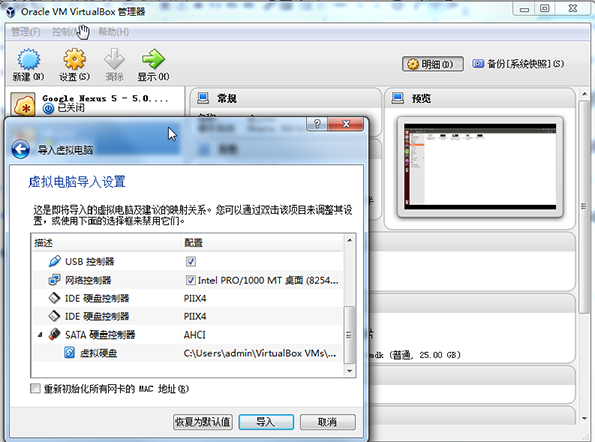
1.2 Import the mirror of the virtual machine in .ova format in VirtualBox
Manage -> Import Virtual Machine ->
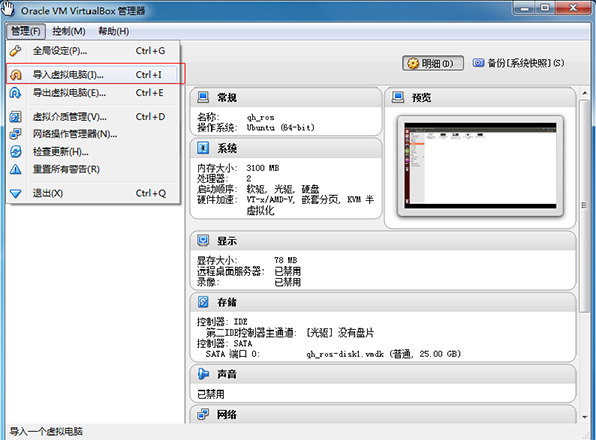
Select .ova document ->
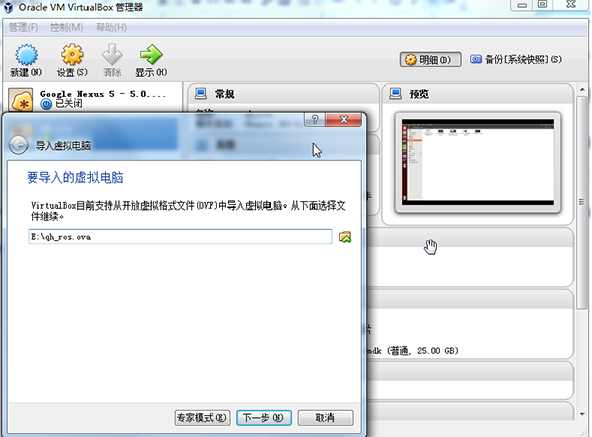
Import(No need to modify configure,and it will spend about 10 minutes)
2. Use Details
2.1 Open Virtual Machine
ubuntu login username:yly, password:yly
2.2 Export and import personal profile of studio?
Double click the studio.sh on the desktop to open android studio
Tutorial (from Baidu):
http://jingyan.baidu.com/article/e4511cf355fbe02b845eafe9.html
You should redeploy jdk route as '/usr/lib/jvm/java-7-openjdk-amd64' when you want to import personal configure in studio.

2.3 Add usb Device
Add usb device(robot) to Ubuntu virtual machine:
Firstly, select 'Virtual Machine -> Configure -> USB -> Start Usb ControlMachine(make tick)'.Secondly, click the blue USB icons right beside the dialog box, and then create a new filter and hook(Do not choose USB devices in this place, to start the virtual machine in the menu bar after the selection is effective.);

Start qh_ros Virtual Machine->Devices From Menu->USB->Select the usb devices connect to mainframe machines directly

Note: If USB device is checked in menu bar not the starter, please unplug and insert USB again.
Note:All above is about the tune up of using virtual machine usb1.1 to connect target machine.Because of the performance problems of usb1.1, it will leads to slow debugging.So we suggest you use usb2.0 control machine to connect and debug.You need to visit virtualbox offical website to download the expansion package of virtualbox extension pack from the corresponding virtualbox version.
PS: Now, ubuntu environment is installed:
After start virtual machine,you will find the documents and folders are as follow:
1.studio.sh: android studio executable file, you can double click it to open android studio and develop.
2.android_dev_tool: android develop environment folder, including android sdk and android studio.
3.android_core : ros android main codes
4.ros_java : ros java main codes
5.qh_ros: It contains a project code provided by Qihan Technology, Qh_ros_user is the daemo program for customers, and users can add own codes or create new projects according this project.
3. Build roaandroid Project In Ubuntu
PS:
1. We have created a example prject in virtual machine, and the route is as follow:
/home/yly/qhros/src/qh_ros_user
2. You must connect wifi network before installing you project in the robot and debugging.Otherwise,client APP and master can not communicate.
3. APP open order:connect wifi to any router,then open QHrosUser(or the app you create).
3.1 Press ctrl+alt+t to open Ubuntu terminal,and create project according to the following command
(You can also modify qh_ros_user project from android studio directly without creating new project)
Create New Project:
1. mkdir -p ~/qhros/src
(Firstly,create folder named qhros,attention:you can define folder route.)
2. cd ~/qhros/src
(Open folder)
3. catkin_create_android_pkg qh_ros_user android_core rosjava_core std_msgs
('qh_ros_user' is the name of project,and add android_core, rosjava_core, std_msgs as depend libraries.)
Create module:
1. cd qh_ros_user
(Open project folder)
2. catkin_create_android_project -t 13 -p com.qihancloud.qh_ros_user qhros_user
(Build module,target version is 13,'qhros_user' is module name)
Compile First Time:
1. cd ../..
(Return to root directory qhros)
2. catkin_make
(Compile catkin)
3.2 Open project in Android Studio
Open Android Studio, and select Import Porject.

Or select File ->New -> Import Project
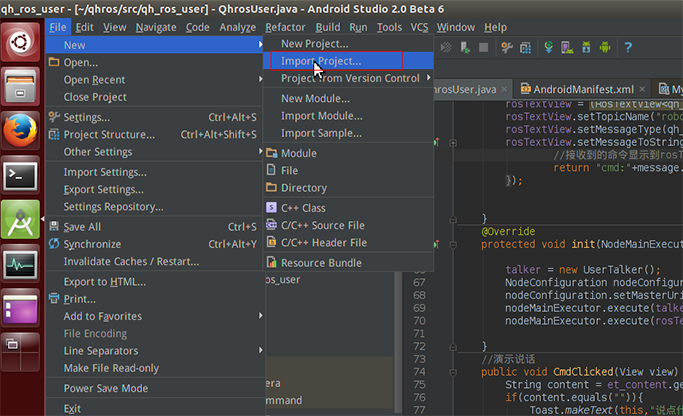
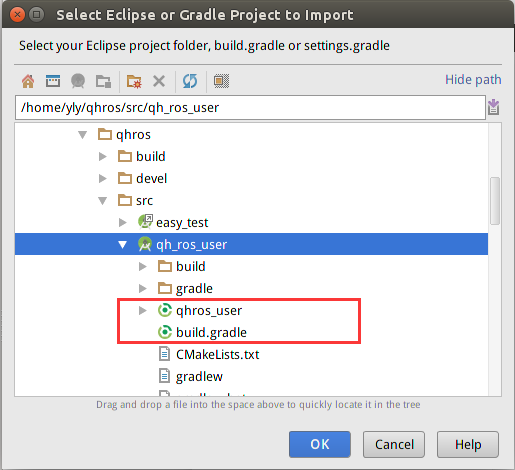
Select import build.gradle from the project(/home/yly/qhros/src/qh_ros_user) created just now.
3.3 Add Depend Libraries
1. Add Message library, copy jar package(Create libs folder at main folder,and copy the jar package(/home/yly/qhros/src/qh_test_msg-0.3.1.jar) from Message to libs folder.)
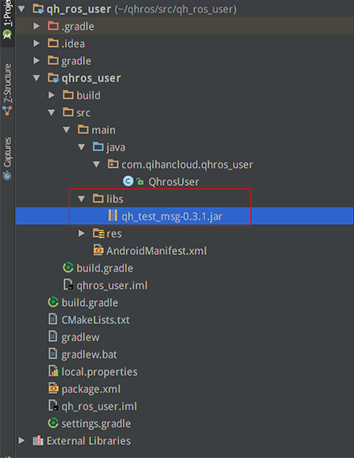
Add as library documents.

Note:Add order libraries(/home/yly/qhros/src/command-sdk.jar) for controlling robot with the same method.
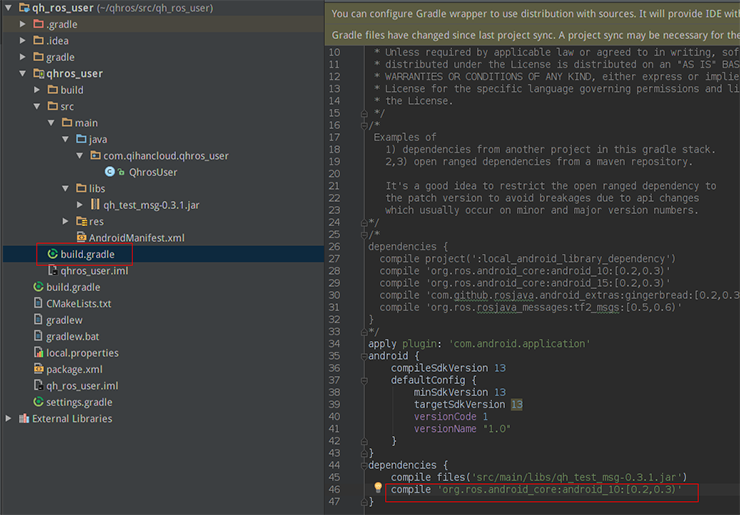
2. Add the dependent library android_core to build.gradle of the project.
dependencies {compile 'org.ros.android_core:android_10:[0.2,0.3)'}
3. Make Project Compile

QhROS Code Interpret
1. Develope Environment
Android studio+WIFI(app must be connected to Internet during running)
2. Program Logic Structure Diagram
3. Preliminary Knowledge
3.1 Control Command Document
Robot Motion Control Instruction.docx
ps: Users should browse througth this document first,and know simply about the command of controlling robot.
3.2 Relevant jar Package
Control command jar package: command-sdk.jar
Message jar package: qh_test_msg-0.3.2.jar
4. Main Function Code
Ps: Full_Code.html
Ps: Install the program example to release ghros: user-release.apk
4.1 Layout
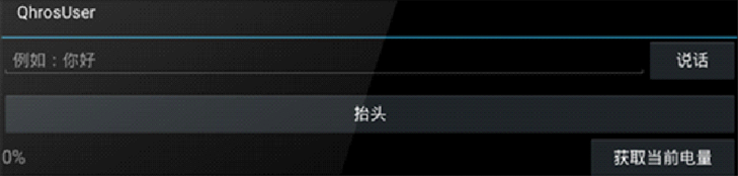
4.2 Demonstrate Robot Raise Head And Speak
We take an example about controlling the robot to raise its head to simply illustrate how to control robot.
We use the HeadUSBCommand class from command-sdk.jar library to create a class object.And config all the parameters.We transfer command parameters to json format with commandToJson() method from GsonUtil tool class of command-sdk.jar library.
//Create head command object
headUSBCommand = new HeadUSBCommand();
//Config head move parameters
headUSBCommand.moveHeadMode = 1;//Move mode
headUSBCommand.moveHeadDirection = 1;//Move direction
headUSBCommand.moveHeadSpeed = 2;//Move speed
//cmd=2 is head command,sub_cmd=0 is command reservation,then call Gson tool class,and transfer command parameters to json format
SaveCmd(2,0, GsonUtil.commandToJson(headUSBCommand));
//ps: Demo robot speak, you only need to execute SaveCmd(100,0,"talking content");
Transfer command data to UserTalker class(that is Publisher).
public void SaveCmd(int cmd, int sub_cmd,String content){
  SharedPreferencesUtil.saveInt(MyApplication.getContext(), "cmd", cmd);
  SharedPreferencesUtil.saveInt(MyApplication.getContext(), "subcmd", sub_cmd);
  SharedPreferencesUtil.saveString(MyApplication.getContext(), "content", content);
  //Tag flag to true
  SharedPreferencesUtil.saveBoolean(MyApplication.getContext(), "flag", true);
}
Create a message object,and config the value of this message object according to the command data, and publish it to the topic 'user_topic'.
//Get command from SharedPreferences
if(SharedPreferencesUtil.getBoolean(MyApplication.getContext(), "flag")){
//Create a message object
QhTestMsg1 str= (QhTestMsg1) publisher.newMessage();
//Config command
str.setCmd( SharedPreferencesUtil.getInt(MyApplication.getContext(), "cmd"));
str.setSubCmd( SharedPreferencesUtil.getInt(MyApplication.getContext(), "subcmd"));
str.setContent(SharedPreferencesUtil.getString(MyApplication.getContext(), "content"));
//Tag flag to false
SharedPreferencesUtil.saveBoolean(MyApplication.getContext(), "flag",false);
//Publish message
publisher.publish(str);
Note: QhTestMsg1 Message Interface: 3 paramters(cmd,sub_cmd,content) constitute the command to control robot.
public interface QhTestMsg1 extends Message {
  //You can name the format with "package name/interface name"
  String _TYPE = "qh_test_msg/QhTestMsg1";
  //Description of message define,two int type data and a string type data
  String _DEFINITION = "int64 cmd\nint64 sub_cmd\nstring content\n\n";
  //Get macro representation
  long getCmd();
  //Config macro representation(input a int type value)
  void setCmd(long var1);
  //Get sub macro representation
  long getSubCmd();
  //Set up sub macro definition (reserved, set as 0 temporarily)
  void setSubCmd(long var1);
  //Get specific control content
  String getContent();
  //Config specific control content
  void setContent(String var1);
}
4.3 Show how to get current quantity of electricity
Create a RosService client
ServiceClient<QhTestSrvRequest, QhTestSrvResponse> serviceClient =connectedNode.newServiceClient("QhServer", qh_test_msg.QhTestSrv._TYPE);
Create a message object, config corresponding cmd command according to the robot status you want to get
QhTestSrvRequest request = serviceClient.newMessage();
request.setCmd(16);//cmd=16 get quantity of electricity command
The client of RosService calls the call method. If the client of RosService is connected successfully, onSuccess obtains the return value response.
serviceClient.call(request,  new ServiceResponseListener<QhTestSrvResponse>() {
  @Override
  public void onSuccess(QhTestSrvResponse response) {
    }
  @Override
  public void onFailure(RemoteException e) {
    throw new RosRuntimeException(e);
  }
});
Response's getContent() method gets content you need.The content's format is json,and it must be converted into corresponding javabean(command-sdk.jar library's HqueryBatteryCommand class).You can get the value you want in Javabean.
String content = response.getContent();
//Convert json into javabean
QueryBatteryCommand queryBatteryCommand = (QueryBatteryCommand) GsonUtil.jsonToCommand(content, QueryBatteryCommand.class);
//Get current quantity of electricity
byte battery = queryBatteryCommand.currentBattery;
Robot Sport Control
1. Robot speak description
Macro definitions: 100
Only need send the macro definition and content of an utterance
Example: Let the robot say 'Hello' send an int value of 100 and a String value 'hello'
2. Head move description
Macro definition: HeadUSBCommand = 2
Corresponding class: HeadUSBCommand
Has the attributes: moveHeadMode (moving mode), moveHeadDirection (moving direction), moveHeadSpeed (moving speed), moveHeadLSBDegree (moving low angle), moveHeadMSBDegree (moving high angle), horizontalLSBDegree (horizontal low angle), horizontalMSBDegree (horizontal high angle) , verticalLSBDegree (low vertical angle), verticalMSBDegree (high vertical angle), horizontal_relative_direction (relative to the horizontal direction), horizontalDegree (relative horizontal angle), vertical_relative_direction (relative to the vertical direction), verticalDegree (relative vertical angle)
Special explanation:
Angle range of horizontal movement of head: 0-180 degrees
Angle range of vertical movement of head: 0-30 degrees
Description for high and low positions:
If you need to control the head to 180 degrees, then the value of moveHeadLSBDegree and moveHeadMSBDegree need how to fill it:
Calculate by the shift operation, the calculation is as follows:
moveHeadMSBDegree=(byte)(((short)180>>8)&0xff)
moveHeadLSBDegree=(byte)((short)180&0xff)
Note: Other parameters with the LSB and MSB field requires that calculates like above.
When moveHeadMode equal to 1, is no angle, you need to set moveHeadDirection and moveHeadSpeed property to HeadUSBCommand object that corresponds to the direction of movement moveHeadDirection value as follows:
moveHeadDirection=1; (UP)
moveHeadDirection=2; (Down)
moveHeadDirection=3; (Left)
moveHeadDirection=4; (Right)
moveHeadDirection=5; (Upper left)
moveHeadDirection=6; (Upper right)
moveHeadDirection=7; (Lower left)
moveHeadDirection=8; (Lower right)
moveHeadDirection=9; (Vertical homing)
moveHeadDirection=10; (Horizontal homing)
moveHeadDirection=11; (Vertical and horizontal all-homing)
moveHeadDirection=0; (Stop moving)
Examples are as follows:
Head move upward
HeadUSBCommand command=new HeadUSBCommand();
command.moveHeadMode=1;
command.moveHeadDirection=1;
command.moveHeadSpeed=3;
Attention:
1、 When movement perform to the thresholdit will auto-stop
2、 When some movement have not finish perform,and if there is another move command,the prior movement will be break, and it will perform current command.
3、 Current move mode(moveHeadMode=1),Effective attribute is moveHeadDirection and moveHeadSpeed, Other attribute no need to set, otherwise, the command will be invalid.
When moveHeadMode is 2,It means operate with angle(corresponding angle),You need to set moveHeadDirection, moveHeadSpeed, moveHeadLSBDegree and moveHeadMSBDegree property of HeadUSBCommand,and the corresponding move direction of moveHeadDirection is as follows:
moveHeadDirection=1; (UP)
moveHeadDirection=2; (Down)
moveHeadDirection=3; (Left)
moveHeadDirection=4; (Right)
moveHeadDirection=5; (Upper left)
moveHeadDirection=6; (Upper right)
moveHeadDirection=7; (Lower left)
moveHeadDirection=8; (Lower right)
moveHeadDirection=0; (Stop moving)
Example:
Move the head 100 degrees to the left
HeadUSBCommand command=new HeadUSBCommand();
command.moveHeadMode=2;
command.moveHeadDirection=3;
command.moveHeadSpeed=3;
command.moveHeadLSBDegree=100;
command.moveHeadMSBDegree=0;
Attention:
1、 If the previous action is not finished, the next action command over the previous action will be interrupted the implementation of the current action.
2、 The current movement mode (moveHeadMode = 2), the effective attributes for the moveHeadDirection, moveHeadSpeed, moveHeadLSBDegree and moveHeadMSBDegree, other attributes do not need to set, otherwise the command will be invalid.
When the moveHeadMode equals 3, for the angled operation (absolute angle), you need to set the moveHeadDirection, moveHeadSpeed, moveHeadLSBDegree, and moveHeadMSBDegree properties to the HeadUSBCommand object, where the value of moveHeadDirection corresponds to the direction of motion:
moveHeadDirection=1; (Vertical direction)
moveHeadDirection=2; (Horizontal direction)
Example:
Move the head 100 degrees horizontally
HeadUSBCommand command=new HeadUSBCommand();
command.moveHeadMode=2;
command.moveHeadDirection=3;
command.moveHeadSpeed=3;
command.moveHeadLSBDegree=100;
command.moveHeadMSBDegree=0;
Attention:
1、 If the previous action is not finished, the next action command over the previous action will be interrupted the implementation of the current action.
2、 The current movement mode (moveHeadMode = 3), the effective attributes for the moveHeadDirection, moveHeadSpeed, moveHeadLSBDegree and moveHeadMSBDegree, other attributes do not need to set, otherwise the command will be invalid.
When the moveHeadMode is equal to 0x20, for a specific action, you need to set the moveHeadDirection property to the HeadUSBCommand object, where the value of moveHeadDirection corresponds to the direction of motion as follows:
moveHeadDirection=1; (Went to the level of 90 degrees then lock)
Example:
Lock the horizontal motor after it moves 90 degrees
HeadUSBCommand headUSBCommand = new HeadUSBCommand();
headUSBCommand.moveHeadMode = 0x20;
headUSBCommand.moveHeadDirection=1;
Attention:
1、 Operate this movement and the motor will be locked,and do not use your hand to move the robot head
2、 The current movement mode (moveHeadMode = 0x20), the effective attributes for the moveHeadDirection, other attributes do not need to set, otherwise the order will be invalid.
When moveHeadMode equal to 0x21, the positioning operation (the absolute angle), you need to HeadUSBCommand object settings moveHeadDirection, horizontalLSBDegree, horizontalMSBDegree, verticalLSBDegree, verticalMSBDegree property, where the value of the corresponding operating moveHeadDirection follows:
moveHeadDirection=0; (Unlock after the action)
moveHeadDirection=1; (Horizontal lock after the action)
moveHeadDirection=2; (Vertical lock after action)
moveHeadDirection=3; (Vertical and horizontal lock after the action)
Example:
Keep your head move to the horizontal direction of 90 degrees, 15 degrees in the vertical direction, unlock after action
HeadUSBCommand headUSBCommand = new HeadUSBCommand();
headUSBCommand.moveHeadMode = 0x21;
headUSBCommand.moveHeadDirection=0;
headUSBCommand.horizontalLSBDegree=90;
headUSBCommand.horizontalMSBDegree=0;
headUSBCommand.verticalLSBDegree=15;
headUSBCommand.verticalMSBDegree=0;
Attention:
1、 Operate this movement and the motor will be locked,and do not use your hand to move the robot head
2、 Current movement mode(moveHeadMode=0x21),Current movement mode is moveHeadDirection、horizontalLSBDegree、horizontalMSBDegree、verticalLSBDegree、verticalMSBDegree, Other attribute no need to set,otherwise it will be invalid.
When moveHeadMode equal to 0x22, the positioning operation (relative angle), you need to HeadUSBCommand object settings moveHeadDirection, horizontal_relative_direction, horizontalDegree, vertical_relative_direction, verticalDegree attributes, moveHeadDirection, horizontal_relative_direction and vertical_relative_direction corresponding to the value as follows:
moveHeadDirection=0; (Unlock after the action)
moveHeadDirection=1; (Horizontal lock after the action)
moveHeadDirection=2; (Vertical lock after action)
moveHeadDirection=3; (Vertical and horizontal lock after the action)
horizontal_relative_direction=1 (Left)
horizontal_relative_direction=2 (Right)
vertical_relative_direction=1 (UP)
vertical_relative_direction=2 (Down)
Example:
Move the head 100 degrees to the left and 15 degrees up from the original position and do not lock it after action
HeadUSBCommand headUSBCommand = new HeadUSBCommand();
headUSBCommand.moveHeadMode = 0x22;
headUSBCommand.moveHeadDirection=0;
headUSBCommand.horizontal_relative_direction=1;
headUSBCommand.horizontalDegree=100;
headUSBCommand.vertical_relative_direction=1;
headUSBCommand.verticalDegree=15;
Attention:
1、 Operate this movement and the motor will be locked,and do not use your hand to move the robot head
2、 Current movement mode(moveHeadMode=0x22),Current movement mode is moveHeadDirection、horizontal_relative_direction、horizontalDegree、vertical_relative_direction、verticalDegree, Other attribute no need to set,otherwise it will be invalid.
3. Wheel control explanation
Macro definition:WheelUSBCommand = 1
Corresponding class: WheelUSBCommand
Has the attribute: moveWheelMode (mobile mode), moveWheelDirection (moving direction), moveWheelSpeed (moving speed), moveWheelLSBDegree (mobile low angle), moveWheelMSBDegree (mobile high angle), moveWheelLSBTime (mobile low time), moveWheelMSBTime (Mobile High Time) , moveWheelLSBDistance (low moving distance), moveWheelMSBDistance (high moving distance), isCircle (whether continuous operation)
When moveWheelMode is equal to 1, is no angle operation, you need to WheelUSBCommand object set moveWheelDirection, moveWheelSpeed, moveWheelLSBTime, moveWheelMSBTime
isCircle attribute, which movesWheelDirection value of the corresponding operation is as follows:
moveWheelDirection=1; (Go head)
moveWheelDirection=2; (Go back)
moveWheelDirection=3; (Turn left)
moveWheelDirection=4; (Turn right)
moveWheelDirection=10; (Translate left)
moveWheelDirection=11; (Translate right)
moveWheelDirection=0x0c; (Left turn)
moveWheelDirection=0xd; (Right turn)
moveWheelDirection=0xf0; (Stop turn)
moveWheelDirection=0; (Stop walk)
Example:
Wheels move forward 10s.
WheelUSBCommand wheelUSBCommand = new WheelUSBCommand();
wheelUSBCommand.moveWheelMode = 1;
wheelUSBCommand.moveWheelLSBTime = 10;
wheelUSBCommand.moveWheelMSBTime = 0;
wheelUSBCommand.moveWheelSpeed = 5;
wheelUSBCommand.isCircle = 1;
wheelUSBCommand.moveWheelDirection=1;
Move the wheels forward all the time:
WheelUSBCommand wheelUSBCommand = new WheelUSBCommand();
wheelUSBCommand.moveWheelMode = 1;
wheelUSBCommand.moveWheelLSBTime = 0;
wheelUSBCommand.moveWheelMSBTime = 0;
wheelUSBCommand.moveWheelSpeed = 5;
wheelUSBCommand.isCircle = 0;
wheelUSBCommand.moveWheelDirection=1;
Pay attention
Stop walking, turn left, turn right, stop turning, no band moveWheelLSBTIme, moveWheelMSBTIme, moveWheelSpeed, isCircle properties, examples are as follows:
Stop walking:
WheelUSBCommand wheelUSBCommand = new WheelUSBCommand();
wheelUSBCommand.moveWheelMode = 0x01;
wheelUSBCommand.moveWheelDirection = 0;
Attention:
1. The current motion mode (moveWheelMode = 1), stop walking, turn left, turn right, stop, do not need to bend with moveWheelLSBTIme, moveWheelMSBTIme, moveWheelSpeed, isCircle property, other actions need to bring moveWheelLSBTIme, moveWheelMSBTIme, moveWheelSpeed, isCircle property. Otherwise, the command is invalid.
2. During the forward wheels need to pay attention to whether there is an obstacle in front, there is an obstacle will automatically stop, behind the robot is no obstacle avoidance function control go back later to note whether an object exists.
When moveWheelMode equal to 2, the operation is angled (relative angle), you need to set moveWheelDirection, moveWheelSpeed, moveWheelLSBDegree, moveWheelMSBDegree property to WheelUSBCommand object corresponding to the value which moveWheelDirection follows:
moveWheelDirection=1; (Turn left)
moveWheelDirection=2; (Turn right)
moveWheelDirection=0; (Stop turn)
Example:
Turn left 30 degrees:
WheelUSBCommand wheelUSBCommand = new WheelUSBCommand();
wheelUSBCommand.moveWheelMode = 2;
wheelUSBCommand.moveWheelSpeed = 5;
wheelUSBCommand.moveWheelLSBDegree = 30;
wheelUSBCommand.moveWheelMSBDegree = 0;
wheelUSBCommand.moveWheelDirection=1;
Attention:
1. The current motion mode (moveWheelMode = 2), do not need to stop moving with moveWheelLSBDegree, moveWheelMSBDegree, moveWheelSpeed attributes, other actions need to moveWheelLSBDegree, moveWheelMSBDegree, moveWheelSpeed property. Otherwise the command is invalid.
When the moveWheelMode is equal to 0x11, for the belt distance operation, you need to set the moveWheelDirection, moveWheelSpeed, moveWheelLSBDistance, moveWheelMSBDistance attributes to the WheelUSBCommand object, where the value of moveWheelDirection corresponds to the following operation:
moveWheelDirection=1; (Go head)
moveWheelDirection=2; (Go back)
moveWheelDirection=3; (Left front)
moveWheelDirection=4; (Left behind)
moveWheelDirection=5; (Right front)
moveWheelDirection=6; (Right behind)
moveWheelDirection=7; (Translate left)
moveWheelDirection=8; (Translate right)
moveWheelDirection=0; (Stop walk)
Example:
Translate left 20cm
WheelUSBCommand wheelUSBCommand = new WheelUSBCommand();
wheelUSBCommand.moveWheelMode = 0x11;
wheelUSBCommand.moveWheelDirection = 0x07;
wheelUSBCommand.moveWheelSpeed = 0x02;
wheelUSBCommand.moveWheelLSBDistance = 20;
wheelUSBCommand.moveWheelMSBDistance = 0;
Attention:
1. When movement mode(moveWheelMode=0x11), stop moving no need to do it with moveWheelLSBDistance、moveWheelMSBDistance、moveWheelSpeed property,other action need to do it with moveWheelLSBDegree、moveWheelMSBDegree、moveWheelSpeed property, Otherwise it will be invalid.
4. Wings Control Instructions
Macro definition:HandUSBCommand = 3
Corresponding class:HandUSBCommand of com.qihan.uvccamera.bean of command-sdk1.0.3.jar
Has the attribute: MoveHandMode (move mode), WhichHand (which control wings), MoveHandDirection (motion direction), MoveHandSpeed (move speed) , MoveHandLSBTime (move the bottom bit time), MoveHandMSBTime (move high time), MoveHandLSBDegree (mobile base position angle), MoveHandMSBDegree (move high angle)."];
var robot_list13_p7 = ["Wings movement range from 0 to 270 degrees","Wings movement range from 0 to 270 degrees
Special explanation:
Wings movement range from 0 to 270 degrees
When the moveHandMode is equal to 1, for the no-angle operation, you need to set the HandHandBCommand object whichHand, moveHandSpeed, moveHandDirection attributes, which moveHandDirection, whichHand the value of the corresponding operation is as follows:
moveHandDirection=1; (Up)
moveHandDirection=2; (Down)
moveHandDirection=3; (Stop)
moveHandDirection=4; (Reset)
whichHand=1; (Left hand)
whichHand=2; (Right hand)
whichHand=3; (Both hands)
Example:
Left hand up:
HandUSBCommand handUSBCommand = new HandUSBCommand();
handUSBCommand.moveHandMode = 1;
handUSBCommand.whichHand = 1;
handUSBCommand.moveHandSpeed = 0x05;
handUSBCommand.moveHandDirection=1;
Both hands down:
HandUSBCommand handUSBCommand = new HandUSBCommand();
handUSBCommand.moveHandMode = 1;
handUSBCommand.whichHand = 3;
handUSBCommand.moveHandSpeed = 0x05;
handUSBCommand.moveHandDirection=2;
Attention:
1. The current movement mode (moveWheelMode = 1), action whichHand, moveHandSpeed, moveHandDirection attribute. Otherwise the command is invalid.
When moveHandMode equal to 2,operation is angled (relative angle), you need to set whichHand, moveHandSpeed, moveHandDirection, moveHandLSBDegree, moveHandMSBDegree HandUSBCommand attribute to the object, wherein moveHandDirection, whichHand corresponding to the value as follows:
moveHandDirection=1;(Up)
moveHandDirection=2; (Down)
whichHand=1; (Left hand)
whichHand=2; (Right hand)
Example:
The left hand moves down 80 degrees in the current position:
HandUSBCommand handUSBCommand = new HandUSBCommand();
handUSBCommand.whichHand = 1;
handUSBCommand.moveHandMode = 2;
handUSBCommand.moveHandSpeed = 0x05;
handUSBCommand.moveHandLSBDegree = 80;
handUSBCommand.moveHandMSBDegree = 0;
handUSBCommand.moveHandDirection=2;
Attention:
1. The current movement mode (moveWheelMode = 2), action whichHand, moveHandSpeed, moveHandDirection,moveHandLSBDegree,moveHandMSBDegree attribute. Otherwise the command is invalid.
When moveHandMode equal to 3operation is angled (relative angle), you need to set whichHand, moveHandSpeed, moveHandDirection, moveHandLSBDegree, moveHandMSBDegree HandUSBCommand attribute to the object, wherein moveHandDirection, whichHand corresponding to the value as follows:
whichHand=1; (Left hand)
whichHand=2; (Right hand)
Example:
Right hand move to 90 degrees position
HandUSBCommand handUSBCommand = new HandUSBCommand();
handUSBCommand.moveHandMode = 0x03;
handUSBCommand.whichHand = 2;
handUSBCommand.moveHandSpeed = 0x08;
handUSBCommand.moveHandDirection = 0x01; handUSBCommand.moveHandLSBDegree = 90;
handUSBCommand.moveHandMSBDegree = 0;
Attention:
1. The current motion mode (moveWheelMode = 3), action needs to be set whichHand, moveHandSpeed, moveHandDirection, moveHandLSBDegree, moveHandMSBDegree attribute and the moveHandDirection value must be 1. Otherwise, the command is invalid.
5. Get the current power description
Macro definition:QueryBatteryCommand = 16
Corresponding class: QueryBatteryCommand
Have the attributes: battery (placeholder), currentBattery (current charge).
Full code
1. MainActivity class
Inheritance Activity, registered WifiReceiver broadcast receivers, for monitoring wifi, only the wifi case before start QhdrosUser.
public class MainActivity extends Activity {

    private static final String TAG = "MainActivity";
    private WifiReceiver mWifiReceiver;
    @Override
    protected void onCreate(Bundle savedInstanceState) {
        super.onCreate(savedInstanceState);
        setContentView(R.layout.activity_main);
        IntentFilter filter = new IntentFilter();
        filter.addAction("android.net.wifi.RSSI_CHANGED");
        filter.addAction("android.net.wifi.STATE_CHANGE");
        filter.addAction("android.net.wifi.WIFI_STATE_CHANGED");

        mWifiReceiver = new WifiReceiver();
        registerReceiver(mWifiReceiver, filter);
        Log.d(TAG, "onCreate...");


    }

    @Override
    protected void onResume() {
       finish();
        super.onResume();

    }

    @Override
    protected void onPause()

    @Override
    protected void onDestroy() {
        unregisterReceiver(mWifiReceiver);
        super.onDestroy();
        Log.d(TAG, "onDestroy...");
    }

    public  class WifiReceiver extends BroadcastReceiver {
        @Override
        public void onReceive(Context context, Intent intent) {
            // TODO Auto-generated method stub
            if(intent.getAction().equals(WifiManager.RSSI_CHANGED_ACTION)){
                //signal strength changed
            }
            else if(intent.getAction().equals(WifiManager.NETWORK_STATE_CHANGED_ACTION))
                else if(info.getState().equals(NetworkInfo.State.CONNECTED)){

                    WifiManager wifiManager = (WifiManager)context.getSystemService(Context.WIFI_SERVICE);
                    WifiInfo wifiInfo = wifiManager.getConnectionInfo();

                    //Get the current wifi name
                    System.out.println("Connect to the network " + wifiInfo.getSSID());
                    Intent intent2 = new Intent(getBaseContext(), QhrosUser.class);//Start roscore and two nodes
                    intent2.addFlags(Intent.FLAG_ACTIVITY_NEW_TASK);
                    getBaseContext().startActivity(intent2);

                }

            }
            else if(intent.getAction().equals(WifiManager.WIFI_STATE_CHANGED_ACTION))
                else if(wifistate == WifiManager.WIFI_STATE_ENABLED){
                    System.out.println("The system open wifi");


                }
            }
        }
    }
}
2. QhrosUser class
Inherited RosActivity activities, life-cycle approach onCreate executed only once for loading layout, first initialize rosTextView nodes (subscribers), init method initializes talker node (publisher) and the implementation of these two nodes
RosActivity is the basic class for all ROS Android application by QhrosUser to how to write a basic ROS of Publisher and Subscriber. Publisher and Subscriber learn when it is equivalent to learn ROSjava a half, because all behavior ROS robots are based on the information sent with the subscription.
/* So that when the activity starts: 1. Start in the foreground NodeMainExecutorService; 2 Start a connection to the master URI, and show progress notice Notify users ROS node is running in the background. */
public class QhrosUser extends RosActivity
{
    private RosTextView<QhTestMsg1> rosTextView;

    private static final String TAG = "UserTalker";
    private UserTalker talker;
    private EditText   et_content;
    private Button     bt_cmd;
    private Button     bt_cmd1;
    public QhrosUser() {

/* Super constructor, two String Android announcement is the title and interrupter information. Users only need to close this announcement can turn off all contact with the ROS node applications. URI is a link to the machine MasterUri */
        super("User2", "User", URI.create("http://"+ InetAddressFactory.newNonLoopback().getHostAddress()+":11311/"));
    }
    /** Called when the activity is first created. */
    @Override
    public void onCreate(Bundle savedInstanceState)
    {
        super.onCreate(savedInstanceState);
        setContentView(R.layout.main);
        et_content = (EditText) findViewById(R.id.et_content);
        bt_cmd = (Button) findViewById(R.id.bt_cmd);
        bt_cmd1 = (Button) findViewById(R.id.bt_cmd1);

        rosTextView = (RosTextView<qh_test_msg.QhTestMsg1>) findViewById(R.id.text);//Custom controls (also node)
        rosTextView.setTopicName("robot_topic");//Set the theme name (Note: The name is same as Publisher setting TopicName)
        rosTextView.setMessageType(qh_test_msg.QhTestMsg1._TYPE);//Set the message type (class library qh_test_msg QhTestMsg1 in the field _TYPE)
            (Note: The name is same as Publisher settings Message Type )
        rosTextView.setMessageToStringCallable(new MessageCallable<String, qh_test_msg.QhTestMsg1>()
        });


    }
/*We define abstract function Ros Activity.init, where we start NodeMain. Establish a connection with masterURI, perform talker information, perform rosTextView display input information.
  And here RosAcitivity manipulated manage other application life cycle, including: 1. Obtain and release WakeLocks and WifiLocks2 .bundling or unbundling NodeMainExecutorService3. when the application is closed end NodeMain*/
    @Override
    protected void init(NodeMainExecutor nodeMainExecutor) {

        talker = new UserTalker();
        NodeConfiguration nodeConfiguration = NodeConfiguration.newPublic(getRosHostname());//Node from a publicly accessible Get node configuration (node to run hostname)
        nodeConfiguration.setMasterUri(getMasterUri());//Set the node controller to register uri
        nodeMainExecutor.execute(talker, nodeConfiguration);//Perform publisher node
        nodeMainExecutor.execute(rosTextView, nodeConfiguration);//Execute the text view node

    }
    //Demo talk
    public void CmdClicked(View view) {
        String content = et_content.getText().toString();
        if(content.equals("")){
            Toast.makeText(this,"Say something!!",Toast.LENGTH_SHORT).show();
            return;
        }
        //Cmd = 100 is the talk command, subcmd = 0 command is reserved bits, content is the content of speech
        SaveCmd(100,0,content);


    }
    //Demo look up
    public void CmdClicked1(View view) {
            //Call command-sdk.jar library method, and set the parameters

            //Create command object head
            HeadUSBCommand headUSBCommand = new HeadUSBCommand();
            //Set the head movement parameter
            headUSBCommand.moveHeadMode = 1;
            headUSBCommand.moveHeadDirection = 1;
            headUSBCommand.moveHeadSpeed = 2;
            //cmd = 2 is the head of the command, subcmd = 0 is the command reserve, call Gson tool class, the command parameters to json format
            SaveCmd(2,0, GsonUtil.commandToJson(headUSBCommand));

    }
    //Save command to SharedPreferences
    public void SaveCmd(int cmd, int sub_cmd,String content){
        //MyApplication.getContext () Is null, not in the manifest file  plus attribute android: name = "com.qihan.uvccamera.MyApplication"
        SharedPreferencesUtil.saveInt(MyApplication.getContext(), "cmd", cmd);
        SharedPreferencesUtil.saveInt(MyApplication.getContext(), "subcmd", sub_cmd);
        SharedPreferencesUtil.saveString(MyApplication.getContext(), "content", content);
        //Tag the flag to true
        SharedPreferencesUtil.saveBoolean(MyApplication.getContext(), "flag", true);
    }
}
3. UserTalker class
Inherited AbstractNodeMain (listening lifecycle NodeListener) passed in a life cycle approach onStart ConnectedNode (connected to a controller node), call newPulisher method of connecting node generates a publisher
public class UserTalker extends AbstractNodeMain {
    private static final String TAG = "UserTalker";
    private String topic_name;
    public UserTalker() {
        this.topic_name = "user_topic";
    }
    public UserTalker(String topic) {
        this.topic_name = topic;
    }
    public GraphName getDefaultNodeName() {
        return GraphName.of("test/UserTalker");
    }
    //Pass in a Connected Node in the life cycle approach onStart in (connected to the controller node)
    public void onStart(ConnectedNode connectedNode) {
        //Call connection node newPulisher method generates a publisher
        /*We set the message format to qh_test_msg.QhTestMsg1._TYPE, sent to the & quot; user_topic theme, which are the key.*/
        final Publisher publisher = connectedNode.newPublisher(this.topic_name, "qh_test_msg/QhTestMsg1");
        connectedNode.executeCancellableLoop(new CancellableLoop() {
            //Loop Listening
            protected void loop() throws InterruptedException {

                //Get command from SharedPreferences
                if(SharedPreferencesUtil.getBoolean(MyApplication.getContext(), "flag")){
                    //Create a message object
                    QhTestMsg1 str= (QhTestMsg1) publisher.newMessage();
                    //Config command
                    str.setCmd( SharedPreferencesUtil.getInt(MyApplication.getContext(), "cmd"));
                    str.setSubCmd( SharedPreferencesUtil.getInt(MyApplication.getContext(), "subcmd"));
                    str.setContent(SharedPreferencesUtil.getString(MyApplication.getContext(), "content"));
                    //Tag flag to false
                    SharedPreferencesUtil.saveBoolean(MyApplication.getContext(), "flag",false);
                    //Publish message
                    publisher.publish(str);

                }

            }
        });
    }
}
4. Client class
Inherited AbstractNodeMain (listening lifecycle NodeListener) passed in a life cycle approach onStart ConnectedNode (connected to a controller node), call newServiceClient method of connecting nodes generate RosService client
public class Client extends AbstractNodeMain {
    private static final String TAG = "Client";
    @Override
    public GraphName getDefaultNodeName() {
    return GraphName.of("qh_services/client");
    }
    @Override
    public void onStart(final ConnectedNode connectedNode) {
    ServiceClient<QhTestSrvRequest, QhTestSrvResponse> serviceClient;
    try {
        //Parameter 1: The service name (RosService must be consistent with the server-defined name); Parameter 2: Message Type
        serviceClient = connectedNode.newServiceClient("QhServer", qh_test_msg.QhTestSrv._TYPE);
    } catch (ServiceNotFoundException e) {
        throw new RosRuntimeException(e);
    }
    //Create a message object, obtains the robot what the status is set according to the corresponding cmd command you want
    final QhTestSrvRequest request = serviceClient.newMessage();
    request.setCmd(16);//cmd=16 Get the current power command
    serviceClient.call(request,  new ServiceResponseListener<QhTestSrvResponse>() {
        @Override
        public void onSuccess(QhTestSrvResponse response) {
            //Successful connection Ros services, get the return value
            String content = response.getContent();
            //Convert json to javabean
            QueryBatteryCommand queryBatteryCommand = (QueryBatteryCommand) GsonUtil.jsonToCommand(content, QueryBatteryCommand.class);
            //Get the current power
            byte battery = queryBatteryCommand.currentBattery;
            Log.d("current power:",""+battery);
        }
        @Override
        public void onFailure(RemoteException e) {
            throw new RosRuntimeException(e);
        }
    });
    }
}
Robot's SDK Summary
Summary
The robot SDK provides third-party developers with the ability to interact with robots. Based on the SDK, the developer can achieve the functions of controlling robot movement, obtaining robot recognition and controlling the speech synthesis of robot. The SDK provides a complete software and hardware interaction solution for developers to achieve personalized development, which can meet the unique needs of robots in different industries.
Seven functional modules
1. Voice module
It provides the ability to acquire robot recognition and control the robot's ability to awaken dormancy and speech synthesis.
2. Hardware control module
Control the behavior of some hardware devices on the robot and obtain the sensor data of the robot.
3. Head & hand & wheel motion control module
Provides the ability to control the movement of the head, hands and wheels of the robot.
4. System management module
Get the basic information of the robot and interact with some software on the robot.
5. Multimedia module
This module can obtain the video stream from the robot's hd camera and obtain the information of face recognition.
6. Projector module
Control the switch of the robot projector and the setting of corresponding parameters.
7. Modular motion control module
Provides the ability to control the robot to walk, recharge and follow the modularization movement.
Three kinds of Lib library
To make it easy for developers to use the SDK in different development environments, three lib libraries are specifically provided: The aar package used for the Android Studio tool; A version jar package for Eclipse or NetBeans; The release of the B version jar package solves the problem of using the other third-party libraries to allow the Activity to inherit the BindBaseActivity we provided. Developers can choose according to their actual situation, without having to change the development environment and configuration.
Mutual Nondisclosure Agreement
Party A:Shenzhen Sanbot Innovation Cloud Technology Co., Ltd.
Party B:Developers
Whereas:
Exchanging of relevant business and technological information is required for the ongoing business discussions or cooperation between Party A and Party B with respect to ,this agreement is entered into by and between Party A and Party B through friendly consultations and under the principle of mutual benefit and joint development.
1. Article One Definition of Confidential Information
Confidential information refers to data and information with respect to relevant businesses and technologies,
whether in written or other forms, that have been disclosed by either Party A or Party B to the other party with clear label or designation of “confidential information”(hereinafter referred to as “confidential information”), excluding the following data and information:
(1) Information that is already or to be make public available,except those disclosed by either Party A or Party B or their representatives in violation of this agreement and without authorization;
(2) Non-confidential information that has come to the attention of the receiving party before the disclosure of the other party;
(3) Non-confidential information offered by either party, before the disclosure of which the receiving party is not informed of the fact that the provider of this information (a third party) has signed a binding confidentiality agreement with the party disclosing the non-confidential information under this agreement, and the receiving party may reasonably presume that the information discloser is not forbidden to offer the information to the receiving party.
2. Article Two Obligations and Liabilities
(1) Both Party A and Party B represent to the other party as the provider and receiver of confidential information, and thus both undertake confidentiality obligations and liabilities.
(2) Neither Party A nor Party B shall disclose or make public any confidential information to a third party (including the press) or otherwise make use of the confidential information without the written approval of the other party; Both parties are obliged to urge their representatives not to disclose or make public any confidential information to a third party (including the press) or otherwise make use of the confidential information; unless the disclosure, publicity and application of the confidential information is required by the due performance of the obligations of the two parties in association with the undertaking and proceeding of the cooperative programs under normal circumstances (including obligations to be assumed by both parties in the future pursuant to the law and the contracts signed by the two parties).
(3) Both parties shall strictly limit the access to the confidential information to their responsible representatives only for the purposes specified hereunder.
(4) Neither party shall provide a third party with copies or duplicates of the confidential information disclosed by the other party or its representative, whether intentionally or not, unless the disclosure is allowed by a written agreement signed by the two parties.
(5) In the event that the proceeding of the cooperative program ceases or either party quits the program with reasons, a party shall and shall urge its representatives to destroy or return to the other party all confidential information as well as all documents and materials and all duplicates thereof containing confidential information within five working days, upon the request of the other party at any time. Nevertheless, the party possessing the confidential information may keep one piece of the duplicates of the documents or materials described above only for the purpose enshrined in Article 4 hereunder, without breaching other provisions of this agreement.
(6) Either Party A or Party B shall and shall urge their respective representatives to treat the confidential information provided by the other party with a degree of care no less than that used for the similar information in its own possession. However, under no circumstances shall the treatment of the confidential information be held under a reasonable degree of care.
(7) The jar package,so file and other related documents which provided by party A and Party B can not decompilation it in any way.
(8) Any control command and middleware which provided by party A,and Party B cannot provide it to any other third party.
(9) The code which has deleted the "qh" related characters, Party B cannot provide it to any other third party.
(10) The code, robot control command and strategy which provided by party A,Party B cannot send it to third party or upload it to any open source community.
(11) The virtual machine mirror image file which provided by party A.Party B cannot send it to third party.
3. Article Three Intellectual Property Rights
Disclosure of the confidential information by either Party A or Party B to the other party or its representatives shall not be construed to constitute an assignment or grant to the other party or its representatives of the rights and interests in relation to its trade secrets, trademarks, patents, know-how or any other intellectual property, nor shall it constitute an assignment or grant to the other party or its representatives the rights and interests in relation to the trade secrets, trademarks, patents, know-how, or any other intellectual property authorized by a third party.
4. Article Four Preservation and Application of the Confidential Information
(1) Either Party A or Party B has the right to preserve necessary confidential information, so as to make use of which in implementing binding laws, regulations, and obligations under their cooperative programs.
(2) Either Party A or Party B has the right to make use of the confidential information to defend against any claims, lawsuits, judicial proceedings, and accusations towards the receiving party or its representatives in relation to the programs hereunder and relevant affairs, or to respond to summons, subpoena, or other legal proceedings with respect to the programs hereunder and relevant affairs.
(3) Either party can, in light of actual demand, disclose the confidential information in any reports, statements or certificates submitted to any regulatory organs at municipal, provincial, central, or other levels that have jurisdiction or assert having jurisdiction over the receiving party, after informing the other party in written form and making a copy for the other party of the disclosed information.
5. Article Five Dispute Settlement and Governing Laws
This agreement shall be governed by and be interpreted in accordance with the laws of the People's Republic of China. With respect to any issues, disputes, lawsuits or proceedings arising from or in connection with the rights and obligations of the parties hereunder, the two parties shall irrevocably accept the jurisdiction of the people's courts of the People's Republic of China.